يُعد ربط البراغي بشكل صحيح العامل الأكثر أهمية لضمان موثوقية الوصلة الحافلية. يجب على الفنيين تطبيق عزم دوران محدد على عدة مراحل، مثل 30%، و60%، ثم 100% من قيمة العزم النهائية. يتطلب هذا التطبيق المنهجي لعزم الدوران استخدام مفتاح ربط معاير والالتزام الصارم بأنماط عزم الدوران المعتمدة للمسامير. ويضمن تسلسل الشد هذا أن مسامير الفلنجة تمارس ضغطًا متساويًا.
أظهرت دراسة أجرتها شركة «غارلوك سيالينغ تكنولوجيز» أن 82% من حالات فشل الحشيات كانت ناجمة عن ضغط غير سليم بسبب استخدام عزم دوران غير صحيح على البراغي. أما حالات 14%، فقد نتجت فقط عن اختيار المنتج الخاطئ.
باتباع الطريقة الصحيحة برغي الحافة الالتزام بمتطلبات عزم الدوران ليس أمراً اختيارياً. فهذا التسلسل الدقيق لعمليات الشد وعزم الدوران الصحيح لكل مسمار يمنعان حدوث التسربات. وتنطبق أنماط عزم الدوران الصحيحة على كل مسمار شفة، بدءاً من المسمار القياسي صب البراغي إلى المثبتات المخصصة من أ مُصنِّع أدوات التثبيت المخصصة. تضمن هذه العملية سلامة الحافة.
الفحص قبل الشد: الأساس لضمان ثبات الحافة
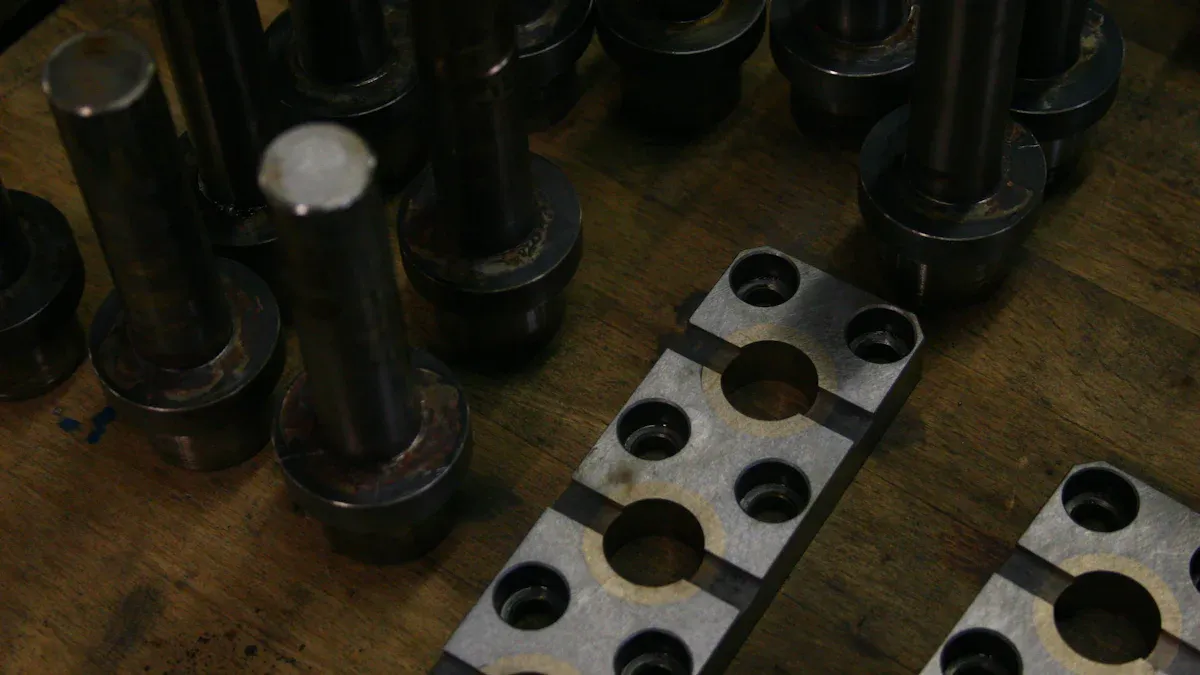
يبدأ التجميع الناجح للفلنجة قبل وقت طويل من قيام الفني بتطبيق عزم الدوران. فالفحص الشامل قبل الشد يمنع فشل الوصلة ويضمن أن قيم عزم الدوران النهائية تحقق الشد الصحيح للمسامير. وتجاهل هذه الخطوة يقوض العملية برمتها.
فحوصات سطح الحافة ومحاذاة الحافة
تعد حالة الحافة نفسها أول نقطة فحص حاسمة. يجب على الفنيين التأكد من أن السطح والمحاذاة يستوفيان المعايير الصناعية الصارمة لضمان إحكام الإغلاق.
فحص أسطح الفلنجات بحثًا عن أي تلف
يقوم الفني أولاً بفحص أسطح إحكام الشفة بحثًا عن أي تلف. فقد تؤدي الخدوش أو الصدأ أو آثار الأدوات إلى حدوث تسرب. وتوفر المعايير الصناعية إرشادات واضحة بشأن ما يُعتبر سطح شفة مقبولًا. لا يُسمح أبدًا بوجود نتوءات فوق التسنينات.
- ASME PCC-1: يحدد هذا المعيار معايير فحص الشفاه، بما في ذلك أبعاد العيوب المقبولة.
- ASME B16.5: تحدد هذه المواصفات معايير القبول لمختلف حالات الحواف.
- API 6A: يحدد هذا المعيار متطلبات معدات الضغط، بما في ذلك فحوصات الإحكام والتفاوتات المسموح بها.
التحقق من تشطيب السطح (125-250 RMS)
يُعد تشطيب سطح الحافة عاملاً حاسماً في أداء الحشية. ويعتبر التشطيب الذي يتراوح بين 125 و250 RMS (المتوسط الجذري المربع) هو المعيار القياسي. فهذا الملمس الخشن قليلاً يسمح للحشية اللينة بالاندماج بشكل صحيح، مما يخلق إحكاماً محكمًا عند تطبيق عزم الدوران الصحيح على البراغي. أما السطح الذي يكون أملسًا جدًّا أو خشنًا جدًّا فسيؤثر سلبًا على الإحكام.
التحقق من عدم محاذاة الحافة
يضمن المحاذاة الصحيحة التلامس المتساوي بين أسطح الشفاه. يقوم الفني بالتحقق من وجود نوعين رئيسيين من حالات عدم المحاذاة قبل تثبيت البراغي. وأي حالة من حالات عدم المحاذاة تجعل من المستحيل تحقيق ضغط متساوٍ للحشية، بغض النظر عن عزم الدوران المطبق على كل برغي.
| نوع عدم المحاذاة | حد التفاوت (بوصة) |
|---|---|
| الإزاحة الجانبية أو الإزاحة عن خط الوسط | أقل من 1/16 |
| اختلال محاذاة الدوران | أقل من 1/8 |
التحقق من الحشيات والتعامل معها
الحشية هي العنصر الأساسي في عملية الإحكام. وتعد المواد التي صُنعت منها وحالتها وموضعها جوانب لا غنى عنها لضمان إحكام الوصلة.
اختيار مادة وحجم الحشية المناسبين
يجب على الفنيين التأكد من أن مادة الحشية متوافقة مع سائل النظام ودرجة حرارته وضغطه. على سبيل المثال،, مادة EPDM مناسبة للاستخدام مع الأسيتون، أما مادة Viton® فهي غير مناسبة. إن استخدام مادة غير مناسبة يؤدي حتماً إلى الفشل. كما يجب أن تكون الحشية بالحجم المناسب للشفة.
فحص الحشية بحثًا عن أي تلف
يجب أن تكون الحشية في حالة ممتازة. يقوم الفنيون بفحصها للتأكد من عدم وجود أي تشققات أو مناطق لينة أو تشوهات. ويُعد التخزين السليم أمرًا ضروريًا لمنع تلفها قبل التركيب.
أفضل الممارسات في التعامل مع الحشيات
- يُرجى تخزين الحشيات في مكان بارد وجاف بعيدًا عن أشعة الشمس المباشرة أو الأشعة فوق البنفسجية.
- احتفظ بالحشيات في عبواتها الأصلية لحمايتها من الغبار والتلف.
- لا تعلق الحشيات أبدًا على الأوتاد، لأن ذلك قد يؤدي إلى تمددها وتشوهها.
- يجب التعامل مع الحشيات بأيدي نظيفة أو بارتداء قفازات لتجنب التلوث.
ضمان التمركز الصحيح للحشية
يجب أن تكون الحشية متمركزة تمامًا على سطح إحكام الشفة. فإذا كانت الحشية غير متمركزة، فسوف تتعرض لضغط غير متساوٍ من مسامير الشفة، مما يؤدي إلى حدوث تسرب. ويُعد هذا الفحص البسيط أمرًا حيويًّا لضمان فعالية تسلسل عزم الدوران النهائي.
فحص مسامير الشفة والصواميل والحلقات
المثبتات هي المكونات التي تُطبق قوة التثبيت. وتؤثر حالتها بشكل مباشر على القدرة على تحقيق عزم الدوران المستهدف والحفاظ عليه.
فحص الخيوط للتأكد من عدم وجود تلف أو عيوب
يجب أن تكون الخيوط في كل مسمار وصامولة نظيفة وسليمة. ويبحث الفنيون عن مشكلات مثل خيوط متآكلة أو مسافة غير منتظمة بين اللفات. While a visual check is a good first step, it cannot identify all flaws. A damaged bolt cannot sustain the required torque and must be replaced. Applying torque to a damaged bolt is unsafe.
Verifying Bolt Material Grade and Size
Using the correct flange bolts is mandatory. The material grade determines the bolt’s strength and its ability to handle the specified torque. High-strength bolts are required for most industrial applications.
| Specification No. | Common High-Strength Grades |
|---|---|
| ASTM A193 | B7, B16, B8 Cl.2 |
| ASTM A320 | L7, L43 |
| ASTM A354 | BC, BD |
دور الصواميل المقواة
Hardened washers are essential. They provide a smooth, hard bearing surface for the nut to turn against. This reduces friction and prevents the nut from damaging the flange surface (galling). Using washers helps ensure that the applied torque translates into the correct bolt tension.
The Critical Role of Lubrication in Achieving Target Preload
Proper lubrication is a scientific requirement for accurate bolt tightening, not a mere suggestion. It directly controls the relationship between the applied torque and the clamping force (preload) achieved in a bolt. Without it, torque values are unpredictable and joint integrity is compromised.
Why Lubrication is Not Optional
Technicians must understand that a dry or improperly lubricated bolt makes a secure seal nearly impossible. Lubrication addresses two fundamental challenges in every bolted flange connection: friction and galling.
Reducing Friction for Accurate Bolt Load
When a technician applies torque to a nut, most of the energy does not contribute to bolt stretch. In an unlubricated assembly, friction consumes the vast majority of the effort.
- Thread Friction: The force needed to turn the nut against the bolt threads.
- Nut Face Friction: The force needed to overcome friction between the turning nut and the stationary washer or flange surface.
Studies show that approximately 90% of applied torque is used to overcome these frictional forces. This leaves only 10% of the energy to generate the clamping force in the bolt. Proper lubrication dramatically reduces this wasted energy, making the applied torque a much more accurate indicator of the final bolt load.
Preventing Galling and Thread Seizure
Galling, or cold welding, occurs when the threads of the nut and bolt seize under extreme pressure. This damages the fasteners, making them impossible to remove without destructive methods. A quality lubricant creates a protective film between the metal surfaces of the bolts, preventing direct contact and ensuring the fasteners can be safely disassembled for future maintenance.
Understanding the Friction Factor (K-Factor)
To calculate torque accurately, technicians must account for friction. The friction factor, or K-Factor, is a dimensionless coefficient that consolidates all the complex frictional variables into a single number for use in torque calculations.
What the K-Factor Represents
The K-Factor represents the overall friction in the assembly, including the threads and the nut face. It is not a constant. It changes based on the bolt material, size, surface finish, and, most importantly, the lubricant used. Attempting to determine a K-Factor for dry bolts is unreliable because unseen manufacturing oils can act as a lubricant, leading to inconsistent results.
How Different Lubricants Affect the K-Factor
Different lubricants have vastly different friction coefficients. For example, an experiment might show an unlubricated bolt has a K-Factor of 0.25. Applying a molybdenum disulfide lubricant could lower that same bolt’s K-Factor to 0.16. This change means a lower torque value is needed to achieve the same clamping force. Technicians must use the K-Factor specific to the lubricant being applied to calculate the correct final torque.
How to Apply Lubricant Correctly
The method of application is just as important as the lubricant itself. Inconsistent application on a set of bolts will result in uneven bolt loads across the flange, even with a calibrated wrench.
Application on Bolt Threads
A technician should apply lubricant liberally to the bolt threads. The goal is to ensure all the valleys of the threads are completely filled. This guarantees that the entire engaged thread surface is lubricated during the bolt tightening process, providing a consistent frictional value.
Application on Nut Bearing Surfaces
A significant portion of torque is lost to friction between the nut and the washer. Therefore, applying lubricant to the bearing face of the nut is critical. After applying lubricant and hand-tightening the nut, a small, uniform bead of lubricant should extrude from underneath. This visual cue confirms that all working surfaces are adequately covered, which is essential for an accurate torque application.
Determining Flange Bolt Torque Requirements
Once a technician completes the pre-tightening inspection and applies lubricant, the next step is to determine the correct torque value. This is not a matter of guesswork. The proper برغي الحافة torque requirements depend on achieving a specific clamping force, known as preload, within each bolt.
Understanding Bolt Load vs. Applied Torque
The terms “torque” and “preload” are often used together, but they represent different physical concepts. A technician applies torque, but the ultimate goal is to achieve a precise preload.
The Difference Between Preload and Torque
Torque is the rotational force applied to a nut. Preload, or bolt load, is the tension created in a bolt as it is tightened. This tension causes the bolt to stretch slightly, like a very stiff spring. This elongation induces stress within the bolt material. The amount of preload is directly related to this bolt elongation. The primary purpose of this preload is to create a clamping force that holds the flange joint together and compresses the gasket.
Why Preload is the Ultimate Goal
The clamping force from preload must be great enough to withstand the forces trying to separate the flange, ensuring the gasket remains compressed. The target preload is typically set as a percentage of the bolt material’s yield strength.
For many standard applications, technicians aim for a preload that develops 40% to 70% of the bolt’s yield strength. This keeps the bolt within its elastic range, allowing it to function like a spring without permanently deforming. Exceeding this range risks yielding the bolt and causing joint failure.
Achieving the correct preload is the true objective. However, measuring preload directly through methods like bolt elongation requires specialized tools. Applying torque is a more common but less precise method of estimating preload.
| Tightening Method | Accuracy |
|---|---|
| By feel | ±35% |
| Torque wrench | ±25% |
| Turn-of-the-nut | ±15% |
| Load indicating washer | ±10% |
| Bolt elongation | ±3-5% |
| Strain gages | ±1% |
| Ultrasonic sensing | ±1% |
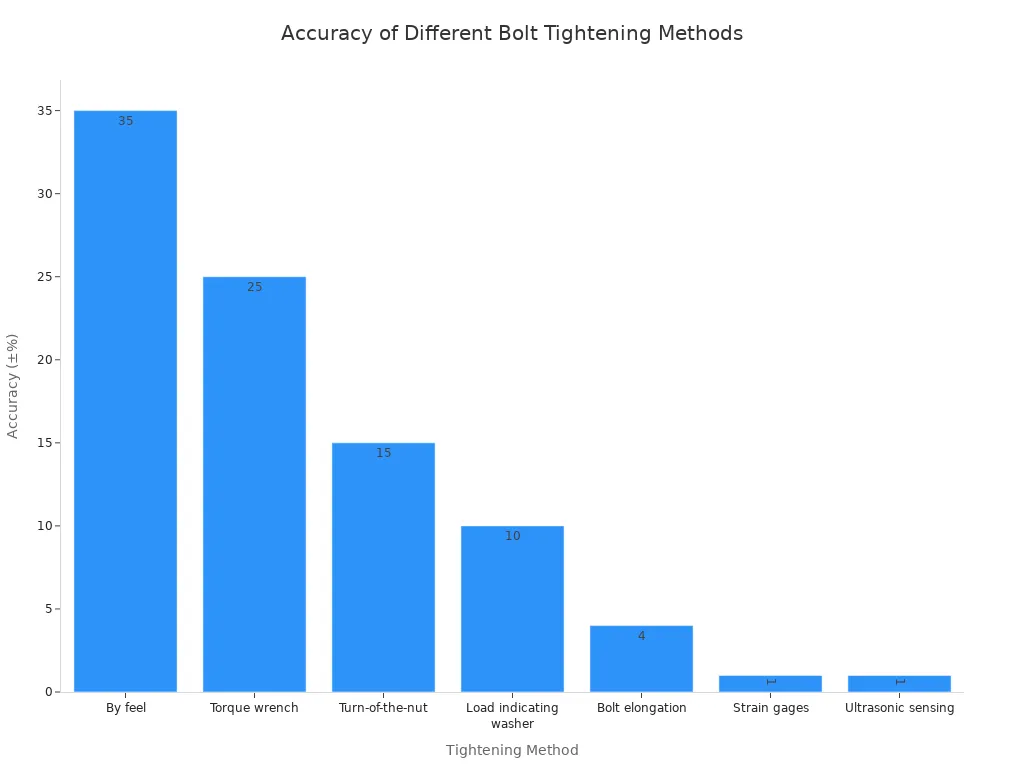
The chart shows that a torque wrench has an accuracy of ±25%. This variability highlights why controlling factors like lubrication is so critical to making the applied torque a reliable indicator of preload.
Using Standard Flange Bolt Torque Charts
For most common applications, technicians rely on standard torque charts. These charts provide pre-calculated torque values based on industry standards like ASME B16.5.
How to Read an ASME B16.5 Torque Chart
Torque charts simplify the process by listing final torque values based on several key inputs. A technician uses the chart by finding the intersection of the flange size and its pressure class.
For example, the table below shows torque values for a flange using a specific bolt type and lubricant.
| Flange Class | Flange Size | Final Torque (ft-lbs) |
|---|---|---|
| الفئة 150 | 4″ | 120 |
| 10 بوصات | 320 | |
| الفئة 300 | 4″ | 200 |
| 10 بوصات | 490 |
To find the torque for a 4-inch Class 300 flange, a technician locates the “Class 300” section, finds the “4”” row, and reads the corresponding value: 200 ft-lbs. This is the final target torque for that specific bolt.
Factors Influencing Chart Values
The values in a torque chart are not arbitrary. They are calculated based on several variables:
- Flange Class: Higher pressure classes (e.g., Class 300 vs. Class 150) require a stronger seal and thus a higher torque.
- Flange Size: Larger flanges use more or larger bolts, which require a higher torque to achieve the necessary clamping force.
- Bolt Material: The chart assumes a specific material grade (e.g., ASTM A193 B7). A different bolt material would require a different torque.
- Lubricant: Chart values are always tied to a specific lubricant and its K-Factor. Using a different lubricant without adjusting the torque will result in incorrect preload.
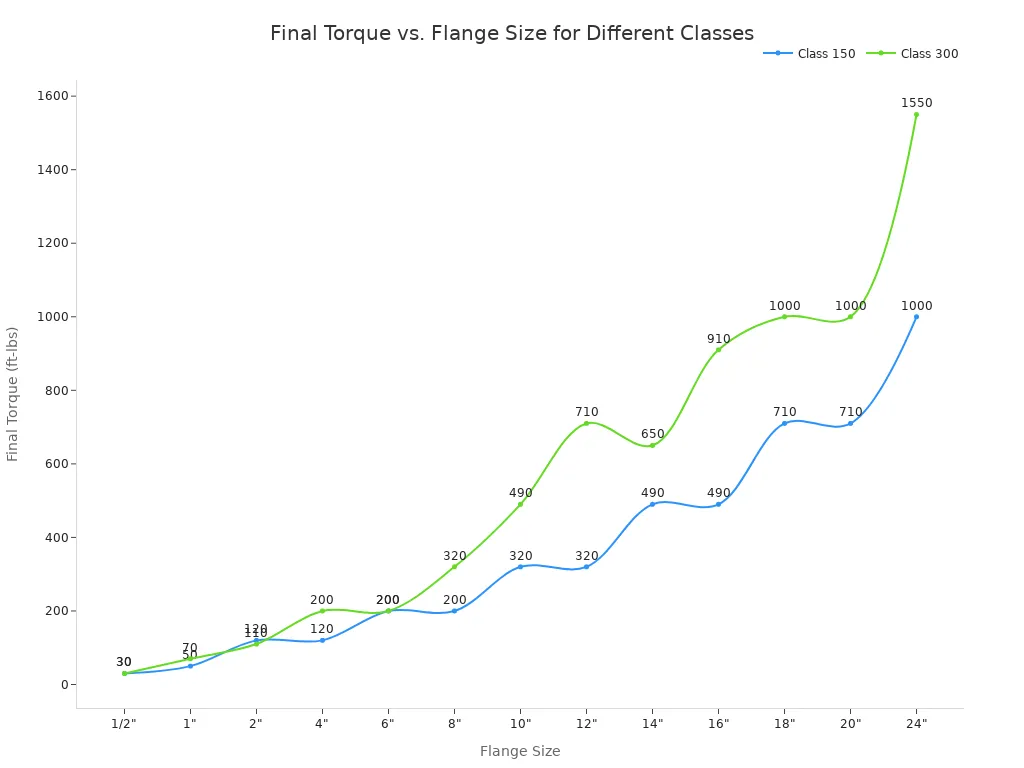
This chart clearly illustrates how torque requirements increase with both flange size and pressure class.
Calculating Torque Values Manually
In some situations, a standard chart is not available or appropriate. In these cases, a technician must calculate the flange bolt torque requirements manually.
The Torque Formula (T = KDF)
The most common formula for calculating torque is a simplified equation that provides a reliable estimate.
T = K * D * F
- T = Torque: The target rotational force to apply (in inch-pounds).
- K = K-Factor (or Nut Factor): The coefficient of friction, which is determined by the lubricant used. This value is typically provided by the lubricant manufacturer.
- D = Nominal Bolt Diameter: The diameter of the bolt (in inches).
- F = Target Bolt Load (Preload): The desired clamping force (in pounds), usually calculated as a percentage of the bolt’s yield strength.
This formula directly links the applied torque to the target preload, reinforcing the importance of both lubrication (K) and understanding the bolt’s mechanical properties (F).
When to Use Calculated Values over Charts
Manual calculation is necessary under several conditions:
- Non-Standard Components: When using a bolt material, size, or lubricant not covered by an available chart.
- Critical Service: For high-pressure, high-temperature, or hazardous fluid applications where maximum accuracy is required.
- No Chart Available: For custom-designed equipment or less common flange standards (e.g., some Class 600 or higher flanges) where published torque charts are not readily available.
Calculating the torque ensures that the procedure is tailored precisely to the components and service conditions of the specific joint.
Executing the Flange Bolt Torque Sequence
With the inspection complete and components prepared, the technician can begin the assembly. Executing the correct flange bolt torque sequence is a methodical process that guarantees a leak-free seal. This procedure requires precision at every step, from numbering the bolts to performing the final check pass. Following the proper tightening sequence is essential for the integrity of the entire flange joint.
Step 1: Numbering the Flange Bolts
Before applying any torque, a technician must establish a clear reference for the tightening sequence. This simple action prevents confusion and ensures the correct bolt torque patterns are followed accurately.
Establishing a Clockwise Sequence
The standard practice is to assign a number to each bolt, moving in a clockwise direction around the flange. The bolt at the top is typically designated as bolt #1. This numbering system serves as a map for the entire flange bolt torque sequence, ensuring each bolt is tightened in the correct order during every pass.
Step 2: Following Approved Bolt Torque Patterns
A technician never tightens adjacent bolts consecutively. This would cause the flange to clamp down unevenly, tilting the flange faces and creating dangerous leak paths. Instead, they must use approved bolt torque patterns that distribute the clamping force evenly across the gasket surface. There are several types of bolt torque patterns, but the star pattern is the most common.
The Logic Behind the Criss-Cross (Star) Pattern
The criss-cross or star pattern is the industry-standard method for tightening a circular flange. The technician tightens a bolt and then moves to the bolt approximately 180 degrees across the flange diameter. This action pulls the flange faces together squarely and applies uniform pressure on the gasket. Repeating this pattern ensures that no single area of the flange is over-compressed, which is the key to achieving a reliable seal. This is one of the most critical types of bolt torque patterns.
Pattern Example: 4-Bolt Flange (1-3-2-4)
For a simple 4-bolt flange, the tightening sequence is straightforward. The technician follows a basic criss-cross pattern:
- Tighten bolt #1.
- Tighten bolt #3.
- Tighten bolt #2.
- Tighten bolt #4.
Pattern Example: 8-Bolt Flange (1-5-3-7-2-6-4-8)
With more flange bolts, the star pattern becomes more apparent. For an 8-bolt flange, the technician follows a more complex sequence to maintain even pressure. The approved tightening sequence is: 1-5-3-7-2-6-4-8. This pattern ensures the clamping force is distributed systematically around the entire flange.
Pattern Example: 12-Bolt Flange (1-7-4-10-2-8-5-11-3-9-6-12)
For larger flanges with more bolts, adhering to the correct bolt torque patterns is even more critical. A 12-bolt flange requires the following sequence: 1-7-4-10-2-8-5-11-3-9-6-12. A technician must follow these bolt torque patterns exactly on every pass.
Step 3: Applying Torque in Incremental Passes
Applying the full torque to a bolt in a single pass is a critical error. This action can overload the gasket and damage the flange. Instead, a technician must apply torque incrementally over multiple passes, following the established bolt torque patterns each time. This gradual approach allows the gasket to seat properly and the bolts to share the load evenly.
Pass 1: The Snug Pass (20-30% Torque)
The first pass is the snug pass. The technician sets the torque wrench to 20-30% of the final target torque. Following the star pattern, they tighten each bolt to this initial value. This pass brings the flange faces into contact with the gasket uniformly without applying significant stress. It ensures all components are properly aligned before significant load is applied.
Pass 2: The Intermediate Pass (50-60% Torque)
For the second pass, the technician increases the torque setting on the wrench to 50-60% of the final value. Again, they follow the exact same star pattern, tightening each bolt to this intermediate torque. This step continues the process of evenly compressing the gasket and increasing the preload in the flange bolts.
Pass 3: The Final Torque Pass (100% Torque)
In the third pass, the technician sets the wrench to the final torque value (100%). They repeat the star pattern one more time, bringing each bolt to its specified final torque. This pass is intended to achieve the target preload in all the bolts and fully compress the gasket to create the seal. This is a key step in meeting the flange bolt torque requirements.
Pass 4: The Final Rotational Check Pass
ملاحظة مهمة: The tightening process is not complete after the 100% torque pass. As torque is applied to subsequent bolts, the preload in the previously tightened bolts can relax slightly. This is known as elastic interaction or cross-talk.
The final step is a rotational check pass. The technician keeps the wrench set at 100% torque and moves to each bolt in a circular, clockwise pattern (e.g., 1-2-3-4…). They apply torque to each bolt until the wrench “clicks” without the nut turning. This pass confirms that every bolt is holding its target torque and compensates for any minor load relaxation. This final check ensures the tension in each bolt is at or above the minimum required installation tension, verifying the integrity of the completed joint.
Selecting and Using the Right Tightening Tools
Choosing the correct tool is as important as the tightening procedure itself. The tool must be capable of delivering the required torque accurately and consistently. A technician’s choice ranges from simple manual wrenches to powerful hydraulic systems, each suited for different applications.
Manual Torque Wrenches
Manual torque wrenches are common for general-purpose flange work. They require physical effort from the technician to apply the necessary torque to each bolt. The two primary types offer different feedback mechanisms.
Click-Type Torque Wrenches
A click-type wrench is a setting torque tool. A technician dials in the target torque value. When the wrench reaches that value during tightening, it produces an audible “click” and a slight slip. This feedback makes it easy to apply a consistent torque to each bolt without needing to watch a dial.
Beam or Dial-Type Torque Wrenches
A beam-type wrench is an indicating tool. It has a pointer that moves along a scale to show the amount of torque being applied. While simple and easy to verify for calibration (the pointer should be at zero), its accuracy depends on the technician’s ability to read the scale correctly, which can be difficult in awkward positions.
| ميزة | Click-type wrench | Beam-type wrench |
|---|---|---|
| Feedback | Audible click | Visual pointer deflection |
| سهولة الاستخدام | Easy, beginner-friendly | Moderate, requires clear line of sight |
| الدقة | High at the set torque | Depends on user’s visual alignment |
| Ideal Application | General-purpose, repetitive tasks | Light-duty, occasional use |
Powered Torque Tools
For large flanges or high-pressure systems, manual wrenches may not provide enough force. Powered torque tools offer the necessary power, speed, and precision for demanding jobs.
Pneumatic Torque Wrenches
Pneumatic torque wrenches use compressed air to drive a gearbox, multiplying the force applied to a bolt. They offer continuous rotation, making them faster than hydraulic tools for running down a nut on a bolt.
Hydraulic Torque Wrenches
Hydraulic torque wrenches deliver the highest levels of force and precision. They are essential for large-diameter flanges where achieving the correct bolt preload is critical.
Hydraulic systems provide unmatched torque capacity, superior precision, and enhanced safety. They can deliver over 47,000 Nm of torque, ensuring even load distribution and preventing joint failure. This level of control is impossible with manual tools on a large bolt.
The Importance of Tool Calibration
An uncalibrated wrench makes every other step in the process meaningless. Calibration ensures that the torque value set on the tool is the torque value delivered to the bolt.
Recommended Calibration Frequency
Industry standards govern the calibration of torque tools. Key standards include ISO 6789 and ASME B107.300-2010. These standards recommend that a torque wrench be calibrated at least once a year or after any suspected overload event, such as being dropped. Regular calibration is mandatory for any quality-controlled bolting procedure.
How to Read a Calibration Certificate
A calibration certificate is the official record of a tool’s accuracy. It documents the torque readings of the tool against a traceable measurement device. The certificate confirms that the tool performs within the acceptable tolerance, giving the technician confidence that the applied torque is correct for each bolt.
Common Mistakes and How to Avoid Them
Even a well-trained technician can make errors that compromise a joint’s integrity. Avoiding these common mistakes is just as important as following the correct procedure. These errors fall into two categories: procedural shortcuts and equipment misuse. Understanding these pitfalls is the key to ensuring a safe and leak-free flange connection.
Critical Procedural Errors
Procedural errors often happen when technicians take shortcuts to save time. These mistakes directly undermine the principles of proper bolt torque patterns and even load distribution.
Reusing Gaskets or Flange Bolts
A technician must never reuse gaskets. A gasket is a single-use component designed to deform and create a seal under a specific torque. Once compressed, it loses its ability to seal effectively. Similarly, reusing a bolt is risky. A tightened bolt can stretch permanently (yield), meaning it cannot achieve the correct preload on a subsequent use, even if the correct torque is applied.
⚠️ Safety Alert: A yielded bolt is a compromised bolt. It has lost its spring-like properties and cannot maintain the required clamping force, creating a significant risk of joint failure.
Tightening in a Circular Pattern
Following approved bolt torque patterns is not optional. A technician who tightens bolts in a circular sequence (1-2-3-4) applies uneven pressure to one side of the flange. This action tilts the flange, crushes one side of the gasket, and leaves a gap on the other. This mistake makes a leak inevitable. The only correct method is to use proper bolt torque patterns, like the star pattern, to ensure even compression. This is a fundamental rule of every tightening sequence.
Applying Full Torque in a Single Pass
Applying 100% of the final torque to a bolt in one go is a critical failure. This action overloads the gasket in one area before the other bolts are even snug. It can damage both the gasket and the flange. A technician must apply torque incrementally. Following multi-pass bolt torque patterns ensures the flange faces come together squarely and the bolt load is distributed evenly. Each bolt requires this careful application of torque.
Equipment and Component Errors
The second category of mistakes involves the tools and parts used for the assembly. Using faulty components or uncalibrated tools makes achieving the correct torque impossible.
Using Unlubricated or Improperly Lubricated Bolts
An unlubricated bolt requires significantly more torque to overcome friction. A technician applying a standard torque value to a dry bolt will achieve a dangerously low preload. This happens because most of the torque is wasted fighting friction instead of stretching the bolt. This error directly violates the principles of accurate torque application.
Using an Uncalibrated or Incorrect Wrench
A torque wrench is a precision instrument. If its calibration is out of date, the torque value on the dial does not match the torque delivered to the bolt. Using an uncalibrated wrench is equivalent to guessing the torque. This makes the entire tightening sequence unreliable. The technician must always verify the tool’s calibration certificate before starting work.
Ignoring Damaged Flange Faces
The pre-tightening inspection is a mandatory step. A technician who ignores scratches, gouges, or rust on a flange face is setting the joint up for failure. No amount of torque or adherence to bolt torque patterns can compensate for a damaged sealing surface. A leak path will exist from the start. The only solution is to repair or replace the damaged flange.
Advanced Considerations for Bolted Joints
Standard bolting procedures cover most applications, but critical service conditions demand advanced techniques. Technicians must adapt their approach for large, high-temperature, or high-pressure flanged joints to ensure long-term integrity and safety. This involves specialized procedures and sometimes alternative bolt tightening methods.
Tightening Large Diameter Flanges
Large diameter flanges introduce significant challenges. The sheer size and number of bolts make achieving uniform gasket compression difficult. A technician often needs powered equipment to apply the immense torque required for each bolt. Hydraulic torque wrenches are essential in these scenarios. They provide the necessary force and control to execute the multi-pass torque sequence accurately, ensuring the massive flange seals correctly.
Dealing with High-Temperature or High-Pressure Service
High-temperature systems cause bolt materials to relax over time, leading to a loss of preload. This relaxation can be severe. For example, an ASTM A193 Grade B7 bolt can lose up to 60% of its preload at 725°F. To counteract this, technicians perform a “startup retorque.”
This procedure, formerly called “hot torquing,” is a planned maintenance step to restore bolt load after initial thermal cycles. It is not a live repair.
Key aspects of a startup retorque include:
- It is performed while the system is warm, ideally between 250°F and 450°F.
- Technicians must not perform the retorque above 450°F, as lubricant breakdown changes the friction factor and makes the applied torque unreliable.
- The technician applies the original final torque value to each bolt, typically in a circular pattern.
- اختيار الصحيح bolt material, such as ASTM A193 B16, is also critical to minimize relaxation in high-temperature service.
Alternative Methods: Bolt Tensioning
For the most critical applications, applying torque is not accurate enough. Bolt tensioning is a superior method that achieves a precise bolt load by eliminating the variable of friction. This bolt tightening method directly stretches the bolt.
When to Use Tensioning Instead of Torquing
ASME recommends bolt tensioning over torquing for the most demanding services. A technician should use this method for:
- High-pressure connections
- High-temperature connections
- Safety-critical connections where preload accuracy is essential
A Brief Overview of the Tensioning Process
In bolt tensioning, a technician places a hydraulic tensioner over the bolt and nut. The tool grips the bolt threads and pulls the bolt, stretching it axially to a precise target load. The technician then turns the nut down to secure the bolt at that exact tension. Releasing the hydraulic pressure transfers the load from the tool to the nut, locking in the preload. This process provides a much more accurate and uniform clamping force than applying torque.
A successful flange joint results from a precise, methodical process. A technician achieves a leak-free flange through proper bolt tightening. This process starts with a thorough inspection of the flange and each bolt. Proper lubrication is a non-negotiable step for achieving the correct bolt load. A technician must strictly follow the multi-pass flange bolt torque sequence. This tightening sequence uses specific bolt torque patterns. Adherence to these bolt torque patterns ensures even gasket compression. The correct bolt torque patterns are critical. Following all bolt torque patterns with a calibrated wrench set to the final torque value is essential. This careful application of torque, following the right bolt torque patterns and tightening sequence, meets all flange bolt torque requirements. The correct torque for each bolt, using the right bolt torque patterns, guarantees a reliable flange joint. This bolt tightening method, with its specific bolt torque patterns and torque values, is key. The torque on each bolt matters. The torque and bolt torque patterns are vital.
الأسئلة الشائعة
Why can’t a technician apply full torque in one pass?
Applying full force at once creates uneven pressure. This action can damage the gasket and flange. A technician must apply torque incrementally to ensure each bolt receives the correct load. This method prevents leaks and ensures a proper seal for every bolt.
What happens if a bolt is not lubricated?
An unlubricated bolt requires much more force to overcome friction. A technician applying a standard torque value will achieve a dangerously low preload. This means the bolt is not tight enough. Proper torque application depends on lubrication.
Can a technician reuse a flange bolt?
Best Practice: Always use a new bolt and gasket for every assembly.
A technician should never reuse a high-strength bolt. The initial torque application can stretch the bolt permanently. A yielded bolt cannot achieve the required clamping force or handle the specified torque again. Replacing each fastener is essential for safety.
How often should a torque wrench be calibrated?
A technician must use a calibrated torque wrench. Industry standards recommend calibration at least once a year or after any suspected damage. An accurate torque reading is critical for applying the correct force to each bolt.
What is the purpose of the final rotational check pass?
The final pass verifies that every bolt maintains its target value. Tightening one bolt can slightly loosen others. This check, done at 100% torque, ensures each fastener is at or above the required final torque, confirming a secure joint.
Is more torque always better for a bolt?
No, more force is not better. Excessive torque can stretch a bolt beyond its yield point, causing permanent damage. A technician must apply the specified value to achieve the correct preload without overloading the bolt or gasket.