Dehnungsbolzen sind unverzichtbare Befestigungselemente, die für die Befestigung in festen Materialien wie Beton verwendet werden. Ein Spreizdübel funktioniert, indem er sich in einem vorgebohrten Loch ausdehnt. Dieser Mechanismus erzeugt einen starken Reibungsgriff, um Objekte zu sichern. Diese Spreizdübel sind von entscheidender Bedeutung für die nachträgliche Montage von Gebäudestrukturen. Ein starker Ankerbolzen trägt erhebliche Lasten und sorgt für Stabilität. Für besondere Anforderungen kann ein Hersteller von kundenspezifischen Verbindungselementen können spezialisierte Ankerbolzen, einschließlich kundenspezifische Ankerbolzen. Diese Spreizschrauben sind ein wesentlicher Bestandteil des modernen Bauwesens.
Wie funktionieren Spreizdübel?
Spreizdübel funktionieren nach einem einfachen, aber wirkungsvollen mechanischen Prinzip. Die Konstruktion eines Spreizdübels ermöglicht es ihm, eine unglaublich sichere Verbindung innerhalb eines festen Materials herzustellen. Wenn man diesen Mechanismus versteht, wird klar, warum diese Verbindungselemente im Bauwesen so zuverlässig sind.
Das Prinzip der mechanischen Expansion
Die Kernfunktion besteht in der Umwandlung der Rotationskraft in Druck nach außen. Durch diesen Prozess entsteht ein fester Halt, der sich dem Herausziehen aus dem vorgebohrten Loch widersetzt.
Reibung und Kraft
Wenn ein Installateur die Mutter einer Spreizschraube anzieht, wird ein Gewindebolzen oder eine Schraube nach oben gezogen. Durch diesen Vorgang wird ein konischer Kegel in eine Spreizhülse gezogen. Die Hülse wird gezwungen, sich nach außen auszudehnen und fest gegen die Innenwände des Lochs zu drücken. Dieser enorme Druck erzeugt eine hohe Reibung, die die Hauptkraft ist, die den Dübel an Ort und Stelle hält und ein Verrutschen verhindert.
Mechanismus der Lastübertragung
Die Ankerschraube dient als Brücke für die Übertragung von Lasten. Jede Kraft, die auf das gesicherte Anbauteil einwirkt, egal ob es sich um eine nach unten (Scherung) oder nach außen (Zug) gerichtete Last handelt, wird durch die Schraube übertragen. Der Bolzen überträgt diese Kraft dann auf die aufgeweitete Hülse. Schließlich verteilt die Hülse die Last über eine große Fläche im Beton oder Mauerwerk und stellt sicher, dass das Grundmaterial das Gewicht sicher tragen kann.
Hauptbestandteile einer Spreizbolzeneinheit
Die meisten Dehnschrauben bestehen aus vier Hauptteilen, die zusammenwirken. Die Materialzusammensetzung dieser Komponenten ist entscheidend für Leistung und Haltbarkeit.
Der Gewindebolzen oder Bolzen
Dies ist der Hauptschaft des Befestigungselements. Er verfügt über ein Gewinde, das in eine Mutter eingreift, um die Anzugskraft zu erzeugen. Dieses Bauteil trägt die direkte Last des zu befestigenden Gegenstands.
Die Dehnungshülse oder der Schutzschild
Die Hülse ist ein Metallzylinder, der um den Bolzen passt. Sie ist mit Schlitzen oder einer speziellen Form versehen, die es ihr ermöglicht, sich auszudehnen, wenn der Keil hineingezogen wird. Dies ist der Teil, der direkten Kontakt mit den Wänden des Bohrlochs hat.
Der Spreizkeil oder -kegel
Der Keil befindet sich am unteren Ende der Baugruppe und ist ein kleines, kegelförmiges Teil. Wenn die Schraube angezogen wird, wird dieser Kegel in die Hülse gezogen und wirkt als Katalysator für die Ausdehnung. Das Zusammenspiel von Keil und Hülse ist das Herzstück des Befestigungsmechanismus.
Materialien sind wichtig 💡 Die Wahl des Materials wirkt sich direkt auf die Festigkeit und Korrosionsbeständigkeit dieser Dübel aus. Zu den gängigen Materialien gehören:
- Kohlenstoffstahl: Eine kostengünstige Wahl für trockene Anwendungen in Innenräumen.
- Rostfreier Stahl: Qualitäten wie 304 und 316 eignen sich hervorragend für die Verwendung im Außenbereich oder in Umgebungen mit hoher Feuchtigkeit und korrosiven Elementen.
- Hochwertige Legierungen: Für extreme Bedingungen verwenden die Hersteller moderne Stähle wie Duplex 2304 oder spezielle Kombinationen für maximale Langlebigkeit.
Die Mutter und die Unterlegscheibe
Die Mutter wird auf den Bolzen aufgeschraubt, um die erforderliche Anzugskraft aufzubringen. Die Unterlegscheibe sitzt zwischen der Mutter und der Vorrichtung und verteilt die Spannkraft gleichmäßig, um eine Beschädigung der Oberfläche des zu befestigenden Objekts zu verhindern.
Was sind die wichtigsten Arten von Dehnschrauben?

In der Bauindustrie werden mehrere Haupttypen von Dehnschrauben verwendet. Jede Ausführung dient einem bestimmten Zweck und bietet einzigartige Vorteile für unterschiedliche Grundmaterialien und Belastungsanforderungen. Das Verständnis dieser Unterschiede ist der Schlüssel zur Auswahl des richtigen Befestigungselements für eine sichere und dauerhafte Installation.
Keilverankerungen
Keildübel sind bekannt für ihre außergewöhnliche Haltekraft in massivem Beton. Sie sind die erste Wahl für viele strukturelle und hochbelastbare Anwendungen.
Beschreibung und Mechanismus
Ein Keildübel ist ein einteiliges Befestigungselement, das aus einem Gewindebolzen, einer Mutter, einer Unterlegscheibe und einem Spreizclip an der Basis besteht. Der Installateur bohrt zunächst ein Loch in den Beton und reinigt es gründlich. Der Dübel wird dann in das Loch geschlagen. Durch das Anziehen der Mutter wird der Bolzen nach oben gezogen und der Spreizclip gezwungen, sich zwischen dem konischen Ende des Bolzens und der Lochwand zu verkeilen. Dadurch entsteht ein enormer Druck nach außen, der zu einem starken und dauerhaften Reibschluss führt.
Beste Anwendungsfälle
Keildübel eignen sich hervorragend zur Befestigung schwerer Lasten in massivem Beton. Ihre hohe Zug- und Scherfestigkeit macht sie ideal für kritische Verbindungen. Installateure verwenden sie für Sicherung von Stahlträgern und Säulen auf Betonfundamenten. Sie verankern auch schwere Maschinen auf Fabrikböden und sorgen so für Betriebsstabilität und Sicherheit. Diese Dübel sind die endgültige Wahl für die meisten Schwerlastanwendungen, die eine maximale Tragfähigkeit erfordern.
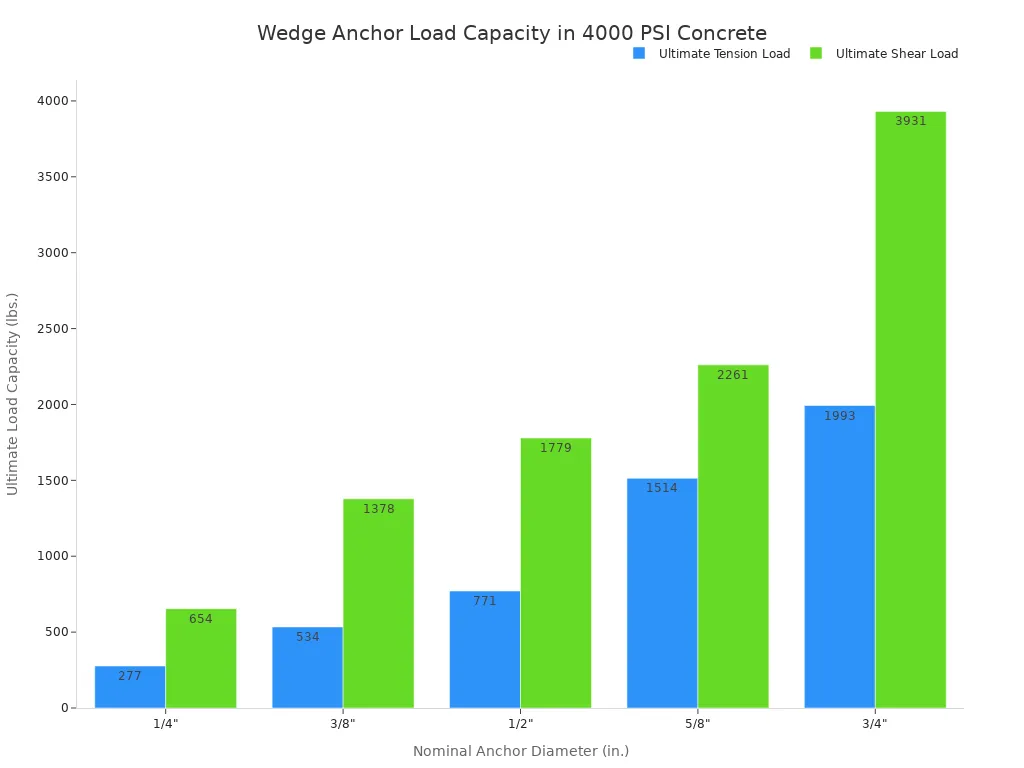
Die Tragfähigkeit eines Keildübels nimmt mit seinem Durchmesser deutlich zu. Die folgende Tabelle veranschaulicht die Tragfähigkeiten für gängige Keilankergrößen in Beton mit 4.000 PSI.
| Nenndurchmesser des Ankers (in.) | Tragfähigkeit bei Zugbelastung (lbs.) | Ultimative Scherlastkapazität (lbs.) |
|---|---|---|
| 1/4″ | 277 | 654 |
| 3/8″ | 534 | 1,378 |
| 1/2″ | 771 | 1,779 |
| 5/8″ | 1,514 | 2,261 |
| 3/4″ | 1,993 | 3,931 |
Hülsenanker
Hülsenanker sind äußerst vielseitige Befestigungsmittel, die für ihre Anpassungsfähigkeit an eine breite Palette von Grundmaterialien, einschließlich Beton, Ziegel und Block, bekannt sind.
Beschreibung und Mechanismus
A Hülsenspreizdübel besteht aus einem Gewindebolzen, einer Mutter, einer Unterlegscheibe und einer Spreizhülse über die gesamte Länge. Beim Anziehen des Bolzens wird ein sich verjüngender Konus am unteren Ende des Bolzens nach oben in die Hülse gezogen. Dadurch dehnt sich die Hülse in ihrer gesamten Länge nach außen aus und sorgt für einen sicheren Halt über die gesamte Tiefe des Bohrlochs. Durch diesen Mechanismus eignet sie sich für Materialien, die weniger dicht sind als fester Beton.
Beste Anwendungsfälle
Die Vielseitigkeit von Hülsenankern macht sie zu einer beliebten Wahl für allgemeine Befestigungszwecke. Sie sind für leichte bis mittelschwere Lasten geeignet. Zu den üblichen Anwendungen im Wohn- und Gewerbebereich gehören:
- Befestigung von Handläufen an Betonstufen oder Ziegelwänden.
- Montage von großen Flachbildfernsehern und Regalen.
- Befestigung von Elektrodosen und Kabelbindern.
- Installation von Haltegriffen im Badezimmer und andere Einrichtungsgegenstände.
Ihre Fähigkeit, in verschiedenen Grundmaterialien zu arbeiten, macht sie zu einem wertvollen Bestandteil vieler Renovierungs- und Bauprojekte.
Drop-In-Anker
Einschlaganker sind Dübel mit Innengewinde, die für mittelschwere Befestigungen in massivem Beton ausgelegt sind. Sie sind ideal für Anwendungen, die einen bündig eingebauten Ankerpunkt erfordern.
Beschreibung und Mechanismus
A Einschlaganker ist ein kurzer, zylindrischer Spreizdübel mit Innengewinde. Er verfügt über einen vorinstallierten Spreizdübel an seiner Basis. Nach dem Bohren eines Lochs lässt der Installateur den Dübel einfallen, bis er bündig mit der Betonoberfläche abschließt. A Spezial-Setzgerät wird dann in den Anker eingeführt und mit einem Hammer geschlagen. Durch diesen Schlag wird der innere Dübel nach unten gedrückt, wodurch sich der Ankerfuß ausdehnt und fest im Beton verankert. Ein separater Gewindebolzen oder eine Gewindestange kann dann in den Anker geschraubt werden.
Spezialwerkzeug erforderlich ⚙️ Für den ordnungsgemäßen Einbau von Einschlagankern ist ein spezielles Setzwerkzeug erforderlich. Dieses Werkzeug ist ein Stück gehärteter Kohlenstoffstahl der genau auf den Innendurchmesser des Dübels abgestimmt ist. Mit Hilfe eines Standardhammers wird der Innendübel in die richtige Tiefe getrieben, um die volle Spreizung zu erreichen, ohne das Gewinde des Dübels zu beschädigen.
Beste Anwendungsfälle
Einschlaganker werden in erster Linie für Überkopfanwendungen verwendet, bei denen Gewindestangen benötigt werden, um Gegenstände von einer Betondecke abzuhängen. Ihr bündiges Design schafft einen sauberen und unauffälligen Ankerpunkt. Übliche Anwendungen für diese Anker sind:
- Hängende Rohrhalterungen und Sprinkleranlagen.
- Aufhängung von Freileitungsrinnen und elektrische Leitungen.
- Anbringen von Beleuchtungskörpern und Deckenventilatoren.
Diese Konstruktion ermöglicht ein einfaches Entfernen der verschraubten Halterung, ohne dass ein überstehender Bolzen zurückbleibt.
Schlagdübel (Hammer-Set)
Unter den verschiedenen Arten von Spreizdübeln zeichnet sich der Schlagdübel durch seine Einfachheit und Schnelligkeit aus. Es handelt sich um einen einteiligen Spreizdübel, der für die schnelle, dauerhafte Installation in massivem Beton konzipiert ist.
Beschreibung und Mechanismus
Ein Schlagdübel, auch Hammerschlagdübel genannt, besteht aus einem zylindrischen Körper und einem inneren nagelähnlichen Stift. Der Körper wird in ein vorgebohrtes Loch eingesetzt. Der Installateur schlägt dann den Bolzen mit einem Hammer in den Ankerkörper ein. Die nach unten gerichtete Kraft des Bolzens spreizt den Dübelkörper und bildet einen sicheren Keil gegen den Beton. Dieser unkomplizierte Mechanismus erfordert keine speziellen Setzwerkzeuge oder Drehmomentschlüssel und ist damit eine der schnellsten verfügbaren Verankerungslösungen.
Beste Anwendungsfälle
Schlagdübel sind eine ausgezeichnete Wahl für leichte bis mittelschwere statische Anwendungen, bei denen die Installationsgeschwindigkeit eine Priorität ist. Ihr Design ist besonders effektiv für die Befestigung von dünnen Materialien oder Vorrichtungen direkt auf Beton. Installateure bevorzugen sie oft für Überkopfarbeiten, bei denen ein bündiger, fertiger Kopf erwünscht ist. Zu den üblichen Anwendungen gehören:
- Befestigung Metallschienen, Halterungen und Unterkonstruktionsleisten
- Sicherung von Elektrokästen, Leitungsbändern und HVAC-Aufhängungen
- Montage von Schildern und Sicherheitsvorrichtungen
- Verankerung von Betonschalungen und Fahrradständern
Die einfache Handhabung des Ankers macht ihn auch für bestimmte Heimwerkerprojekte geeignet. Zum Beispiel kann eine Familie Schlagdübel verwenden, um dauerhaft einen Picknicktisch auf einer Betonterrasse aufstellen, und gewährleisten Stabilität und Sicherheit.
Lag Shield Verankerungen
Zuganker sind ein zweiteiliges Befestigungssystem, das für die Verwendung mit Zugschrauben konzipiert ist. Sie bieten eine zuverlässige Verankerung in einer Vielzahl von Mauerwerksmaterialien, einschließlich solcher, die weicher oder spröder sind als massiver Beton.
Beschreibung und Mechanismus
Ein Zuganker ist ein zylindrischer Anker mit Außenrippen und Innengewinde. Diese Dübel werden in der Regel aus einer korrosionsbeständigen Zinklegierung hergestellt, die allgemein als Zamac, was sie zu rostfrei und für feuchte Umgebungen geeignet. Der Installateur setzt das Schild zunächst in ein vorgebohrtes Loch. Dann wird eine Zugschraube durch die Halterung und in das Schild geschraubt. Wenn der Monteur die Schraube anzieht, werden die Seiten des Schildes nach außen gezogen, so dass sich die Außenrippen fest in das Grundmaterial einbrennen. Dadurch entsteht ein starker Reibungswiderstand über die gesamte Länge des Schildes.
Drehmoment ist der Schlüssel ⚙️ Eine ordnungsgemäße Installation erfordert ein sorgfältiges Anziehen. Ein zu starkes Anziehen kann den Anker ausreißen oder das Grundmaterial beschädigen. Das maximal empfohlene Anzugsdrehmoment für einen 3/8″ langen Zuganker beträgt zum Beispiel nur 10 ft./lbs. Beachten Sie stets die Herstellerangaben.
Beste Anwendungsfälle
Dank ihrer Konstruktion eignen sich Zuganker ideal für die Verankerung in Grundmaterialien wie Ziegeln, Mörtelfugen und Blöcken. Der Schild verteilt die Last auf eine größere Fläche und verringert so das Risiko von Rissen in spröden Materialien. Sie sind eine verlässliche Wahl für leichte bis mittelschwere Anwendungen. Installateure verwenden sie für:
- Anbringen von Schildern und Satellitenschüsseln an Ziegelwänden.
- Sicherung von Fallrohren und Fensterschutzvorrichtungen.
- Befestigung von Handläufen und Regalen am Block oder Ziegelstein.
- Anbringen von schwerem Wanddekor und Einrichtungsgegenständen.
Their ability to work with common lag screws adds to their versatility in both commercial and residential settings.
Step-by-Step Guide to Installing Expansion Bolts
Proper installation is not just a recommendation; it is a requirement for ensuring the safety and load-bearing capacity of any expansion anchor. A meticulous approach at each stage prevents anchor failure and guarantees a long-lasting, secure connection. This step-by-step guide details the professional standard for installing these critical fasteners.
Step 1: Gather Your Tools and Materials
Preparation is the first step toward a successful installation. An installer must assemble all necessary tools and materials before beginning work. This ensures the workflow is efficient and that every component is correct for the specific application.
Selecting the Correct Anchor
The selection process involves more than just picking a fastener. An installer must evaluate the base material (e.g., solid concrete, brick), the load requirements (tensile and shear), and the environmental conditions (interior vs. exterior). For example, a heavy structural beam requires a high-capacity wedge anchor made of stainless steel for outdoor use. A lighter-duty handrail on a brick wall might only need a versatile sleeve anchor. Consulting manufacturer load charts is essential for making an informed decision that aligns with project specifications.
Required Tools
Having the right equipment on hand is crucial for a safe and effective installation. A professional setup ensures precision from drilling to final tightening. The standard toolkit for installing anchors includes a mix of drilling equipment, fastening tools, and essential safety gear.
- Drilling and Cleaning Equipment:
- A hammer drill or rotary hammer provides the necessary impact and rotation for drilling into masonry.
- Carbide-tipped masonry drill bits matched to the anchor diameter are required.
- A wire brush and a compressed air blower or vacuum cleaner are needed for hole cleaning.
- Fastening and Measurement Tools:
- A torque wrench is essential for applying the correct tightening force.
- A standard wrench or socket set can be used for initial tightening.
- A hammer is needed for setting certain anchor types, like wedge and strike anchors.
- A tape measure ensures correct hole depth and anchor spacing.
- Personal Protective Equipment (PPE):
- Safety glasses or goggles protect the eyes from dust and debris.
- A dust mask prevents the inhalation of harmful concrete dust.
- Gloves protect the hands during drilling and handling.
- Ear protection is necessary when operating a loud hammer drill.
Step 2: Drill the Hole
Drilling the hole is the most critical physical step in the installation process. The hole’s dimensions and angle directly influence the anchor’s ability to expand correctly and bear its intended load.
Matching Drill Bit to Anchor Size
Precision is paramount. The drill bit diameter must exactly match the specified diameter for the anchor. A hole that is too small will prevent the anchor from being inserted. A hole that is too large will prevent the expansion mechanism from making firm contact with the base material, severely compromising its holding power.
ANSI Standards for Precision ⚙️ Always use an ANSI-compliant carbide drill bit. These bits are manufactured to strict tolerances, ensuring the drilled hole size is accurate. The nominal size of the anchor (e.g., 1/2″) corresponds to the required drill bit size.
Achieving Correct Depth and Angle
The hole must be drilled to the correct depth and angle. The depth should be slightly deeper than the anchor’s embedment length to provide space for any residual dust. Most hammer drills have an adjustable depth gauge for this purpose.
The installation angle is equally critical. An installer must drill the hole perpendicular (90 degrees) to the concrete surface. An incorrect angle creates uneven load distribution, placing excessive stress on one side of the anchor. This misalignment can lead to premature failure, especially in applications with significant shear or tensile forces. Maintaining a perpendicular angle ensures the load is transferred evenly into the base material, optimizing the anchor’s performance and structural integrity.
Step 3: Clean the Drilled Hole
A clean hole is a strong hole. Failing to remove dust and debris from the drilled hole is one of the most common and critical installation errors. This simple step has a massive impact on the anchor’s ultimate holding capacity.
Why Cleaning is Critical
Concrete dust and debris act as a lubricant. When an anchor expands, this fine powder prevents the sleeve or wedges from achieving a direct, high-friction grip on the solid concrete walls. The result is a significant reduction in holding power—in some cases, by more than 50%. The anchor may feel tight during installation but can slip or pull out under a much lower load than specified.
Methods for Debris Removal
Effective cleaning is a multi-step process that requires mechanical and pneumatic action. The professional standard for cleaning a drilled hole is the “brush-blow-brush-blow” method.
- Initial Blow: Use a compressed air blower or a manual hand pump to blow out the loose dust from the hole.
- Mechanical Brushing: Insert a stiff wire brush, sized correctly for the hole diameter, and scrub the interior walls vigorously. This action dislodges any compacted dust.
- Final Blow: Use the compressed air blower again to remove all the dislodged particles.
- Visual Inspection: Look into the hole with a flashlight to confirm it is completely free of dust and debris before inserting the anchor.
Step 4: Insert and Set the Anchor
With a clean hole prepared, the next phase of the installation process involves correctly inserting and setting the anchor. This step varies depending on the anchor type, but precision remains essential for a secure outcome.
Proper Insertion Technique
The method for inserting an anchor depends on its design. For through-fixture fastening, common with wedge and sleeve anchors, an installer drills the hole through the object being mounted. The anchor is then inserted through the fixture and into the hole. This technique ensures perfect alignment.
For other types, like drop-in anchors, the anchor is installed first, creating a threaded socket that sits flush with the concrete surface. An installer gently taps the anchor into the hole with a hammer until it is properly seated. The anchor bolt is then threaded in after the fixture is positioned.
Insertion Tip 💡 An anchor should fit snugly into the drilled hole. If it requires excessive force, the hole may be too small or have remaining debris. If it is too loose, the hole is oversized, and the installer must re-drill in a new location.
Setting the Anchor Before Tightening
Certain anchors require a “setting” action before the final tightening. This step pre-expands the anchor to lock it into the base material. Drop-in anchors are a prime example of this procedure. The proper installation and use of these anchors relies on a specific setting tool.
An installer follows a precise sequence to set a drop-in expansion anchor:
- The installer drops the anchor into the cleaned hole with the open, threaded end facing up.
- They insert the correct drop-in anchor setting tool into the anchor body.
- Using a hammer, the installer strikes the end of the setting tool firmly.
- They continue hammering until the shoulder of the tool makes contact with the top of the anchor. This confirms the internal plug has been driven down, fully expanding the anchor’s base.
This action firmly wedges the anchor into the concrete, preparing it to accept a threaded bolt or rod.
Step 5: Tighten to the Correct Torque
The final step is to tighten the fastener. Applying the correct amount of rotational force, or torque, is what activates the expansion mechanism and creates the final holding power. This is arguably the most critical step for ensuring the safety and reliability of the connection.
The Role of a Torque Wrench
A torque wrench is a specialized tool that measures and applies a specific amount of tightening force. Using one is not optional in professional settings; it is a requirement for a correct installation. Each anchor manufacturer specifies a required torque value for their products. This value is calculated to achieve optimal expansion without damaging the anchor or the base material.
- Zu geringes Drehmoment fails to expand the anchor sufficiently, resulting in poor holding values and potential slippage under load.
- Überdrehmoment can be catastrophic. It can strip the threads, break the bolt, or generate excessive stress that cracks the surrounding concrete.
Using a standard wrench provides no feedback on the force applied, making it easy to over or under-tighten the anchors. A torque wrench provides the necessary precision for a safe and reliable installation.
Verifying a Secure Connection
After tightening to the specified torque, an installer should perform a final check. The nut should be snug, and the mounted fixture should show no signs of movement or looseness. When using a torque wrench, the tool will typically click or signal when the target torque is reached. The nut should not continue to turn without an increase in resistance, as this could indicate a problem like a stripped thread or a failing base material. A properly installed anchor creates a solid, unyielding connection between the fixture and the masonry.
Key Factors for Choosing the Right Expansion Bolt
Selecting the correct fastener is a critical decision that directly impacts the safety and integrity of building structures. An installer must weigh several factors to ensure the chosen anchor performs reliably under its intended service conditions.
Assessing the Base Material
The material an anchor is fastened into is the foundation of the connection. Its properties dictate which type of anchor is appropriate.
Solid Concrete vs. Hollow Block
Solid concrete provides the strongest base for an expansion anchor. The compressive strength of the concrete significantly affects the load capacity an anchor bolt can handle. Higher-strength concrete allows for greater holding power. However, a key limitation is the risk of cracking if the concrete’s strength is low. For hollow block or materials with voids, an installer should choose a sleeve-type anchor that expands along its length to bridge the hollow sections.
Brick, Stone, and Other Masonry
Brick and stone are more brittle than concrete. They are susceptible to cracking under the high point-of-contact stress created by wedge anchors. For these materials, sleeve anchors or lag shield anchors are better choices. They distribute the expansion force over a larger surface area, reducing the risk of damaging the base material.
Calculating Load Requirements
An installer must understand the forces the anchor will need to resist. This involves calculating both the type and magnitude of the load.
Understanding Tensile vs. Shear Loads
Loads are generally categorized into two types:
- Zugbelastung: This is a pull-out force that tries to pull the anchor straight out of the hole. An example is a suspended light fixture.
- Scherbelastung: This is a side-to-side force that acts perpendicular to the anchor. An example is a sign mounted on a wall.
Many connections experience a combination of both forces.
How to Read Manufacturer Load Charts
Manufacturers provide detailed charts that list the allowable load capacities for their products. These charts are essential for safe design. They show how performance changes with factors like embedment depth and concrete strength. For heavy-duty applications, deeper embedment in stronger concrete yields higher load values.

Safety First ⚠️ The listed allowable loads on charts already include a safety factor. However, installers may need to apply a higher safety factor for critical situations like overhead installations or life-safety equipment.
Considering Environmental Conditions
The environment where the anchor is installed plays a major role in its long-term durability. Moisture and corrosive elements can degrade an anchor over time.
Interior vs. Exterior Applications
Interior applications in dry, climate-controlled environments can typically use standard carbon steel anchors. Exterior applications expose fasteners to rain, humidity, and temperature fluctuations, which accelerate corrosion.
Choosing Corrosion-Resistant Coatings
For outdoor or damp environments, a protective coating is necessary. Hot-dip galvanizing provides a thick, durable layer of zinc that offers excellent corrosion protection. Standard zinc plating is much thinner and is not suitable for exterior use.
| Merkmal | Feuerverzinkung | Zinc Plating (Electroplated) |
|---|---|---|
| Coating Thickness | 2-5 mil (0.002″ to 0.005″) | Less than 1 mil (0.0001″) |
| Exterior Suitability | Hervorragend | Unsuitable |
| Nut Compatibility | Requires oversize tapped nuts | Standard nuts |
For the highest level of protection, especially in coastal or industrial areas, stainless steel anchors are the superior choice.
Anchor Spacing and Edge Distance
An installer must consider the placement of an expansion bolt relative to other fasteners and to the edges of the concrete. Proper spacing and edge distance are crucial for preventing the base material from cracking and ensuring each anchor achieves its full load-bearing capacity. These parameters are not arbitrary; they are based on engineering principles that account for how stress is distributed within the concrete.
Minimum Distance Between Anchors
When an expansion bolt is tightened, it creates a cone-shaped zone of stress in the concrete below it. If two anchors are installed too close to each other, their stress cones will overlap. This overlap concentrates the force in a small area, which can lead to a blowout failure where a chunk of concrete breaks away between the two fasteners. This significantly weakens the connection for both anchors.
To prevent this, manufacturers specify a minimum spacing distance. This distance is typically expressed as a multiple of the anchor’s diameter or its embedment depth.
Rule of Thumb 📏 A common guideline for minimum spacing is 10 times the anchor diameter (10d). For a 1/2-inch anchor, this means maintaining at least 5 inches between the centers of adjacent fasteners. Always consult the manufacturer’s technical data sheet for the precise requirement, as it can vary based on the anchor type and load conditions.
Following these spacing guidelines ensures that each anchor’s stress cone can fully develop without interference, allowing the system to support the intended design load safely.
Minimum Distance from Edges
Placing an anchor too close to an unsupported edge of a concrete slab or wall is a frequent cause of installation failure. The expansion force of the anchor has nowhere to go but outward, which can easily crack or break off the edge of the concrete. This is known as a side-face blowout failure. A compromised edge dramatically reduces the anchor’s tensile and shear capacity.
Manufacturers provide minimum edge distance requirements to prevent this issue. Similar to spacing, this distance is often calculated based on the anchor’s diameter or embedment depth.
- Critical Edge Distance: The minimum distance required to prevent blowout during installation.
- Full Load Edge Distance: The distance needed for the anchor to achieve its full published load capacity. This is often greater than the critical edge distance.
For example, a 1/2-inch wedge anchor might require a minimum edge distance of 2.5 inches (5 times the diameter) but may need to be 5 inches from the edge to develop its maximum strength. An installer must always prioritize the larger of the two values for critical applications. Adhering to these distances preserves the integrity of the concrete and ensures a secure, reliable fastening point.
Häufige Installationsfehler und wie man sie vermeidet
Even the highest quality expansion bolt will fail if unsachgemäß installiert. An installer’s attention to detail is paramount for creating a safe and reliable connection. Avoiding a few common pitfalls ensures the fastener performs exactly as the manufacturer intended.
Using an Incorrect Drill Bit Size
The relationship between the drill bit and the anchor diameter is non-negotiable. Using the wrong size bit is a fundamental error with severe consequences. A hole drilled too large prevents the expansion sleeve from making firm contact with the concrete, resulting in virtually no holding power. Conversely, a hole that is too small will prevent the anchor’s insertion or require excessive force, which can damage the fastener or the base material.
Precision is Mandatory ⚙️ An installer must always use an ANSI-standard carbide-tipped masonry bit that exactly matches the anchor’s required diameter. For a 1/2-inch anchor, a 1/2-inch bit is required. There is no room for substitution.
Failing to Properly Clean the Hole
A clean hole is essential for achieving maximum friction. Many installation failures can be traced back to leftover concrete dust and debris. This fine powder acts as a lubricant, preventing the anchor’s expansion mechanism from gripping the interior walls of the hole. This oversight can reduce the anchor’s load capacity by 50% or more, creating a dangerously weak connection that may fail unexpectedly under load. The professional solution is a simple but thorough cleaning process. An installer should use a wire brush and compressed air to remove all loose particles before inserting the fastener.
Over-Torquing or Under-Torquing the Bolt
Applying the correct rotational force, or torque, is what properly sets the anchor. Both too little and too much torque create problems. Under-torquing leaves the connection loose because the anchor is not fully expanded. Over-torquing is even more dangerous; it can strip the threads, snap the bolt, or generate enough stress to crack the surrounding concrete.
The only way to guarantee correct force is by using a calibrated torque wrench set to the manufacturer’s specifications. For added verification, some modern fastening systems provide visual cues.
- Traditional Direct Tension Indicators (DTIs) have small bumps on a specialized washer that flatten when the correct tension is reached.
- Advanced DTI Squirters® release a bright, colored silicone from the washer, offering an unmistakable visual signal that proper tension has been achieved.
These tools and indicators help an installer confirm a secure and correctly loaded connection every time.
Installing Too Close to an Edge
Placing an anchor too near an unsupported concrete edge is a critical error that often leads to immediate failure. The outward force from the expansion mechanism has nowhere to go but sideways. This pressure easily cracks or breaks off the edge of the concrete, a failure known as a side-face blowout. This mistake compromises the structural integrity of the base material itself. The anchor loses a significant portion of its tensile and shear load capacity, creating an unstable and dangerous connection.
The 5D Rule: A Simple Guideline 📏 A professional installer often follows a simple rule of thumb to avoid this issue. They maintain a minimum edge distance of five times the anchor’s diameter (5D). For a 1/2-inch anchor, this means installing it at least 2.5 inches from any unsupported edge. While this is a good general practice, an installer must always consult the manufacturer’s technical data sheet for the precise minimum edge distance, as it can vary.
Choosing the Wrong Anchor for the Base Material
The effectiveness of an expansion anchor is entirely dependent on the material it is installed into. A high-strength wedge anchor designed for solid concrete will perform poorly in a softer material like brick or hollow block. The intense, focused pressure from the wedge can easily crack or shatter these more brittle materials. This mismatch between the anchor and the base material results in a weak connection that cannot support its intended load.
An installer must carefully match the fastener to the application.
- For Solid Concrete: Keildübel provide the highest load capacity.
- For Brick or Block: Sleeve anchors or lag shield anchors are superior choices. They distribute the expansion force over a larger surface area, reducing the risk of cracking the base material.
- For Hollow Materials: A sleeve-type anchor is necessary to span the internal voids and create a secure grip on both sides of the hollow section.
Selecting the correct fastener is not about choosing the strongest one available. It is about choosing the one engineered to work harmoniously with the specific base material on the job site.
Safety Protocols and Best Practices
An installer’s work with expansion bolts is not complete until all safety measures are addressed. Following established protocols and best practices is essential for protecting workers and ensuring the long-term stability of the installation. These guidelines cover personal safety, regulatory compliance, and ongoing maintenance.
Wearing Personal Protective Equipment (PPE)
Safety on the job site begins with the individual. An installer must wear appropriate Personal Protective Equipment (PPE) during every phase of the installation process. This equipment shields them from common hazards associated with drilling into masonry and handling fasteners.
- Eye Protection: Safety glasses or goggles are mandatory. They protect the eyes from flying concrete dust, chips, and other debris generated by the hammer drill.
- Respiratory Protection: A dust mask or respirator prevents the inhalation of fine silica dust, which can cause serious long-term lung damage.
- Hand Protection: Heavy-duty gloves protect the hands from cuts, abrasions, and the vibrations of power tools.
- Hearing Protection: The loud noise from a hammer drill can damage hearing over time. Earplugs or earmuffs are necessary to reduce this risk.
Adhering to Building Codes and Standards
Professional installations must comply with all relevant building codes and industry standards. These regulations provide a legal framework for ensuring the safety and structural integrity of building structures. For projects in seismic zones, the International Building Code (IBC) provides specific requirements. The IBC references standards like ACI 318, which outlines detailed seismic anchoring provisions for structures in high-risk areas. These codes mandate that post-installed anchors used in such conditions must be qualified through testing in cracked concrete to handle seismic loads. An installer must always verify local amendments and adhere to the specified codes for their jurisdiction to ensure full compliance.
Performing Regular Inspections on Anchored Fixtures
The responsibility for an anchor does not end after tightening the nut. Regular inspections are critical for verifying the ongoing safety and performance of the connection, especially for fixtures supporting critical loads or life-safety systems. A structured inspection schedule helps identify potential issues like corrosion, wear, or loosening before they lead to failure.
Inspection Frequency 🗓️ The required interval between inspections depends on the application:
- Temporary Anchor Points: Must be inspected before each use.
- Permanent Anchor Points: Require annual checks, with more frequent re-testing in harsh environments.
- Post-Incident: An anchor that has sustained a significant impact, such as a fall arrest event, requires immediate inspection by a competent person.
A thorough inspection involves several key steps. An inspector performs a visual examination for any signs of damage or corrosion. They may also conduct mechanical tests, applying a specific load to verify the anchor’s strength. Finally, the inspector reviews all documentation to ensure maintenance records are current and the installation remains compliant with safety standards.
Understanding Anchor Failure Modes
A secure connection depends on understanding how an installation can fail. Engineers and installers recognize several distinct failure modes. Knowing these potential outcomes is the first step toward preventing them and ensuring structural safety. The three primary failure categories involve the concrete base, the steel fastener itself, or the interaction between the two.
One of the most critical failure types is concrete cone failure. This happens when the load exceeds the tensile strength of the concrete, causing a cone-shaped piece of the base material to break away. This failure is particularly dangerous because it is sudden and catastrophic.
- The failure surface typically forms a cone at an angle of approximately 35 degrees from the fastener’s axis.
- It is a fracture-dominated failure that provides minimal warning before a complete loss of capacity.
- This mechanism exhibits a pronounced size effect, where the nominal stress at failure decreases as the overall structure size increases.
Another potential issue is steel failure. This mode occurs when the load exceeds the strength of the steel bolt itself, causing it to stretch (yield) or snap (fracture). Building codes treat this failure mode differently from concrete-controlled failures. For example, ACI 318-19 assigns different seismic reduction factors for steel failure, reflecting its more predictable and ductile behavior compared to the brittle nature of a concrete blowout.
Finally, pull-out failure occurs when the fastener pulls out of the drilled hole without breaking the steel or the concrete. This typically happens when the expansion mechanism does not create enough friction to resist the tensile load. The holding power is directly related to the fastener’s design and its embedment depth.
- The pull-out strength of anchors is highly dependent on the embedment depth and the diameter of the expansion mechanism.
- Experimental data shows that doubling the embedment depth can increase the pull-out capacity by approximately 1.85 times.
- When pull-out does lead to concrete breakout, the failure cone often forms at a shallower angle, typically between 22 and 26 degrees.
Preventing these failures requires strict adherence to engineering specifications, including correct embedment depth, proper spacing, and accurate load calculations.
Expansion bolts are fundamental fasteners that create a reliable anchor in concrete and masonry. An installer must choose the correct type for the job. A heavy-duty wedge anchor is ideal for structural loads, while a versatile sleeve anchor works well for general use. Proper installation is essential to secure objects safely.
Key Takeaway 💡 The entire process, from precise drilling and thorough hole cleaning to applying the correct torque, guarantees the connection’s safety, stability, and durability.
FAQ
Can an installer reuse an expansion bolt?
No, an installer should never reuse an expansion bolt. The expansion mechanism deforms permanently during the initial installation. Removing and reinstalling the anchor compromises its holding power, creating a significant safety risk. Always use a new anchor for every installation.
Which is better: a wedge anchor or a sleeve anchor?
The choice depends on the base material. A wedge anchor offers superior strength in solid concrete. A sleeve anchor is more versatile, providing a secure hold in softer or hollow materials like brick and block by distributing the load over a larger area.
Can expansion bolts be installed in wet concrete?
An installer must wait for the concrete to fully cure before installing any mechanical expansion bolt. Drilling into wet or “green” concrete will not provide a solid base for the anchor to grip, leading to immediate connection failure.
Curing Time is Critical ⏱️ Most concrete requires a minimum of 28 days to reach its designed compressive strength. Installing an anchor before this period can compromise the entire structure.
What happens if I don’t use a torque wrench?
Without a torque wrench, an installer risks over-tightening or under-tightening the anchor. Over-torquing can crack the concrete or break the bolt. Under-torquing prevents the anchor from expanding fully, resulting in a weak connection that could fail under load.
How do I choose the right size expansion bolt?
An installer selects the anchor size based on the load requirements and the fixture’s hole size. Heavier loads require larger diameter anchors. The manufacturer’s technical data provides specific load capacities to help make the correct choice for a safe installation.
Warum ist die Reinigung des Lochs so wichtig?
Concrete dust inside a drilled hole acts as a lubricant. It prevents the anchor from achieving a firm grip on the base material. This oversight can reduce the anchor’s holding power by over 50%, creating a dangerously weak and unreliable connection.