
A клинового анкера is a heavy-duty mechanical expansion anchor engineered for fastening items to solid concrete. The anchor’s holding power comes from a simple but effective mechanism. When an installer tightens the nut, it pulls the anchor stud upward. This action forces an expansion clip at the base to expand, wedging tightly against the concrete and creating a secure frictional hold. The market for reliable wedge anchors and other Анкерные болты is growing steadily.
Market Insight: Concrete Expansion Anchors 📈
- The market size is projected to grow from $2,226.6 million in 2025 to $3,500 million by 2035.
- This reflects an estimated compound annual growth rate (CAGR) of 4.6%.
Many projects require specific solutions, which is why a производитель крепежных изделий на заказ может предоставить специальные анкерные болты.
What is a Wedge Anchor? Anatomy and Components

A wedge anchor appears simple, but its effectiveness comes from three precisely engineered components working together. Each part has a distinct role in creating a secure connection within concrete. Understanding this anatomy is the first step to appreciating how these powerful fasteners function. The design ensures reliability for heavy-duty fastening jobs.
The Threaded Stud Body
The threaded stud is the main body of the wedge anchor. One end is tapered or conical, which is the end that enters the concrete first. The other end is threaded to accept a nut and washer. This long, solid shaft provides the anchor’s length and transfers the load from the fixture into the anchor assembly. Manufacturers produce these studs from various materials to suit different environmental conditions. Common material options include:
- Оцинкованная углеродистая сталь
- Hot-Dipped Galvanized Carbon Steel
- Нержавеющая сталь типа 304
- Нержавеющая сталь типа 316
The choice of material is critical for ensuring long-term performance and corrosion resistance.
The Expansion Clip
The expansion clip is the heart of the anchor’s holding power. This small metal component wraps around the tapered end of the stud. It is designed to expand outward when the stud is pulled upward during installation. As the clip is forced against the tapered cone, it presses firmly against the walls of the drilled hole. This action creates the intense frictional force that locks the anchor in place. The clip’s design allows it to conform to the drilled hole, maximizing surface contact and ensuring a solid grip.
Гайка и шайба
The nut and washer are the final components that complete the assembly. Installers use the nut to set the anchor and secure the fixture. Tightening the nut pulls the threaded stud upward, which initiates the wedging action of the expansion clip. The washer serves an important purpose by evenly distributing the load from the nut across the surface of the fixture. This prevents damage to the fixture material and ensures a secure connection. High-quality wedge anchors are supplied with pre-assembled nuts and washers for immediate use.
Industry Standards Compliance ⚙️ Reputable manufacturers produce wedge anchors that conform to established industry standards like ASTM, DIN, and ISO. This ensures the materials and dimensions of the entire assembly, including the nut and washer, meet strict quality and performance requirements for safe installation.
How Concrete Wedge Anchors Work: A Mechanical Breakdown
The holding power of concrete wedge anchors comes from a straightforward yet powerful mechanical process. This process transforms the rotational energy of tightening a nut into immense frictional force inside the concrete. The sequence involves precise steps, from inserting the anchor to activating its expansion mechanism. Understanding this breakdown reveals why these крепёжных элементов, are trusted for heavy-duty applications.
Insertion into the Hole
The installation process begins with the anchor’s insertion into a pre-drilled hole. The success of the entire installation hinges on the hole’s diameter. The drilled hole in the concrete must be the exact same diameter as the anchor being installed. For example, a 3/8” wedge anchor requires a 3/8” hole. This precise tolerance is not a suggestion; it is a fundamental requirement for achieving the anchor’s specified holding values. Installers use ANSI-standard carbide-tipped drill bits that are sized to match the anchor, ensuring the hole provides the necessary friction for the expansion clip to grip. An incorrectly sized hole is a common reason for installation failure.
Upward Pull from Tightening
Once the anchor is in place, an installer tightens the nut. This action creates a powerful upward pull on the threaded stud. The threads on the stud act as an inclined plane wrapped around a cylinder, providing a significant mechanical advantage. This principle allows a relatively small amount of rotational force (torque) applied to the nut to generate a much larger axial pulling force on the anchor body. The relationship between the applied torque and the resulting pull force can be described mathematically.
- The mechanical advantage (MA) is calculated with the formula: MA = π * D / P
- В этой формуле:
- D represents the thread diameter of the stud.
- P represents the thread pitch (the distance between threads).
- This mechanical advantage directly multiplies the force applied, creating the strong upward pull needed to set the anchor.
The Wedging Action
The upward pull on the stud is the catalyst for the final and most critical step: the wedging action. As the stud moves upward, its tapered cone-shaped end is pulled into the expansion clip. The clip cannot move upward with the stud because it is already in contact with the bottom of the hole. Instead, the tapered cone forces the expansion clip to expand outward. The clip presses with immense force against the interior walls of the concrete hole.
The Foundation of Strength: Friction 💡 The entire holding capacity of wedge anchors relies on this final step. The outward pressure from the expansion clip creates a massive frictional force between the anchor and the surrounding concrete. This friction is what locks the wedge anchor in place, preventing it from pulling out under heavy loads and creating a secure, reliable connection.
Создание силы трения
The wedging action directly generates the anchor’s holding power through immense frictional force. This force is the resistance created when the steel expansion clip presses against the rough interior surface of the hole in the concrete. The principle is simple: the harder the clip pushes outward, the greater the friction. This friction acts along the length of the clip, creating a powerful grip that resists any pull-out force applied to the anchor. The entire design of concrete wedge anchors is optimized to maximize this single, critical interaction.
The Physics of Grip: Normal Force and Friction ⚙️ The holding capacity is a product of the normal force (the outward pressure from the clip) and the coefficient of friction between steel and the base material. Higher installation torque creates a greater normal force, which in turn generates more frictional resistance.
Several factors directly influence the amount of frictional force an anchor can achieve:
- Concrete Compressive Strength: Harder, higher-strength concrete provides a more rigid surface for the clip to grip, allowing for greater frictional force. Softer or lower-strength concrete may not offer the same level of resistance.
- Hole Condition: A clean, dust-free hole is essential. Debris acts like a lubricant, reducing the coefficient of friction and severely compromising the anchor’s holding power.
- Proper Torque: Applying the manufacturer-specified torque is crucial. Under-torquing fails to expand the clip sufficiently, while over-torquing can damage the concrete or the anchor itself.
The Complete Wedge Anchor Installation Guide

Proper wedge anchor installation is critical for achieving the fastener’s maximum rated holding capacity. The process is methodical and requires attention to detail at every stage. Following the manufacturer’s published installation instructions (MPII) is not just a recommendation; it is a requirement for a safe and compliant connection. This guide breaks down the complete process into manageable steps.
Pre-Installation Checklist
Preparation is the foundation of a successful installation. Before any drilling begins, an installer must gather the correct tools and verify that all materials meet project specifications. This initial check prevents costly errors and ensures job site safety.
Required Tools and Materials
An installer should assemble all necessary items before beginning the work. A typical checklist includes:
- Перфоратор: A standard drill lacks the power needed for drilling into concrete.
- Твердосплавное сверло по стандарту ANSI: The bit diameter must exactly match the anchor diameter.
- Wire Brush and Compressed Air/Blower Bulb: For thoroughly cleaning the drilled hole.
- Калиброванный динамометрический ключ: Essential for applying the correct tightening force.
- Молоток: For tapping the anchor into place.
- Клиновые анкеры: The correct diameter, length, and material for the application.
- Средства индивидуальной защиты (СИЗ).
Inspector Verification 🧐 A pre-installation inspection often involves verifying the anchor type, material, and size against the approved construction documents. Special inspectors may also confirm the drilling method and hole cleaning procedures align with the anchor’s evaluation report (e.g., ICC-ES ESR) and MPII.
Меры предосторожности
The installation of concrete wedge anchors involves power tools and potential airborne debris. Adhering to safety protocols is non-negotiable.
- Защита глаз: Always wear safety glasses or goggles to protect against concrete dust and chips.
- Защита органов слуха: A rotary hammer drill operates at high decibel levels.
- Dust Mask/Respirator: Inhaling crystalline silica dust from concrete is a serious health hazard.
- Сверление точного отверстия является основой надежной точки крепления. Диаметр и глубина отверстия должны соответствовать спецификациям производителя для конкретного используемого анкера. Этот шаг является фундаментальным при установке забивных анкеров.: Protect hands from abrasion and sharp edges.
The Installation Process
The installation process consists of five precise steps. Skipping or improperly executing any step will compromise the strength and reliability of the connection.
Шаг 1: Сверление отверстия
An installer uses a rotary hammer and a correctly sized ANSI-standard carbide drill bit to drill a hole into the concrete. The hole’s diameter must be equal to the anchor’s diameter. The hole must be drilled to a specified depth, which is typically at least one anchor diameter deeper than the required embedment.
Трещиноватый против нетрещиноватого бетона 🧱 The American Concrete Institute (ACI) provides criteria for anchor use in cracked versus uncracked concrete. Because factors like load stress and shrinkage can cause cracking, ACI 318 guidelines often treat cracked concrete as the default design assumption for maximum safety. Installers must use wedge anchors rated for the specific condition of the base material.
Шаг 2: Очистка отверстия
A clean hole is absolutely essential for achieving the anchor’s holding power. Debris acts as a lubricant and prevents the expansion clip from making solid contact with the concrete. The most effective method is a sequence of blowing, brushing, and blowing again.
- Use compressed air or a blower bulb to force loose dust out of the hole.
- Scrub the interior walls of the hole with a properly sized wire brush to dislodge any remaining particles.
- Blow the hole out one final time to remove the loosened dust.
Step 3: Position the Fixture and Insert the Anchor
With the hole prepared, the installer positions the item being fastened over the hole. The wedge anchor, with its nut and washer attached, is then inserted through the fixture and into the hole. The nut should be turned just past the top of the anchor body.
Шаг 4: Установка анкера
The installer gently taps the nut end of the anchor with a hammer. This action drives the anchor down into the hole until the washer and nut are snug against the surface of the fixture. This step ensures the expansion clip is properly positioned at the bottom of the hole before tightening begins.
Step 5: Tighten the Nut to Torque Specification
This final step activates the anchor. An installer uses a calibrated torque wrench to tighten the nut. The rotational force pulls the stud upward, forcing the clip to expand and wedge against the hole walls. It is crucial to apply the specific torque value listed in the MPII.
- Недостаточный момент results in insufficient expansion and a weak hold.
- Превышение момента can cause the concrete to fail or damage the anchor itself.
For projects requiring oversight, a special inspector will verify the final installation. They use a calibrated torque wrench to confirm the correct torque was applied. They may also check for a length identification code stamped on the anchor’s end to verify proper embedment depth for wedge anchors recognized for multiple embedments.
Common Applications: Where to Use Wedge Anchors
The strength and reliability of wedge anchors make them suitable for a wide range of fastening tasks in solid concrete. Their applications are broadly categorized into structural and non-structural, though both often involve heavy loads and demand a secure connection. From large-scale construction to industrial facility outfitting, these fasteners provide essential holding power.
Structural Applications
Structural applications involve fastening components that are integral to a building’s framework. In these scenarios, anchor failure could compromise the stability of the structure itself. Engineers specify wedge anchors in these critical connections for their proven performance and high load capacities.
Securing Steel Beams and Columns
Contractors frequently use wedge anchors to attach steel base plates for I-beams and support columns to concrete foundations. This creates a solid connection that transfers the building’s load directly to the footing. The anchor’s diameter and material are chosen based on engineering calculations to handle immense shear and tension forces. The principles of this technology extend to massive civil engineering projects, where barrel and wedge assemblies secure soil anchors and even support suspension bridge cables.
Typical Load Capacities for Steel Connections 📊 The following values are general guidelines for a single anchor in 2,000 PSI concrete. An engineer must always verify project-specific requirements.
Диаметр Длина Zinc-Plated Load Capacity (lbs) Stainless Steel Load Capacity (lbs) 1/4 дюйма. 1-3/4 inches 500 450 3/8 дюйма (≈9,5 мм) 3 inches 1,200 1,100 на 1/2 дюйма (≈12,7 мм) 3-3/4 inches 2,000 1,800
Attaching Sill Plates
In both residential and commercial wood-frame construction, a wedge anchor is a common choice for securing sill plates. The sill plate is the first piece of lumber attached to the top of a foundation wall. Anchoring it properly prevents the wooden structure from shifting or lifting, especially in areas prone to high winds or seismic activity.
Non-Structural Applications
Non-structural applications involve securing items that are not part of the primary building frame but still require a strong, permanent hold. These applications are often just as critical for safety and operational efficiency.
Mounting Heavy Machinery
Factories and workshops rely on wedge anchors for mounting heavy industrial equipment to concrete floors. This includes machinery like lathes, presses, and CNC machines that generate significant vibration and dynamic loads. Proper mounting is essential for operational stability and safety. Selecting an anchor of insufficient size or strength can lead to failures such as steel failure, where the anchor body breaks, or anchor pull-out, where the fastener slips from the hole.
Installing Pallet Racking and Shelving
In warehouses and distribution centers, pallet racking systems must be securely anchored to the floor. The significant weight of stored goods creates a high risk of tipping if the racks are not fastened correctly. Installers use wedge anchors at the base of each upright to ensure the entire shelving system remains stable and safe for personnel.
Securing Handrails and Guardrails
Safety railings along walkways, mezzanines, and stairwells are critical for fall protection. A wedge anchor provides the robust connection needed to secure the base plates of these guardrails to the concrete substrate. The reliability of the anchor ensures the railing can withstand the required lateral forces specified in building codes.
Choosing the Right Wedge Anchor for Your Project
Selecting the appropriate wedge anchor is a critical decision that directly impacts the safety and longevity of an installation. An installer must consider the project’s environment, the load requirements, and the thickness of the material being fastened. Making the right choice ensures optimal performance and a secure connection.
Material Types and Environments
The surrounding environment is the primary factor in determining the correct anchor material. Each material offers a different level of corrosion resistance, making it suitable for specific conditions.
Оцинкованная углеродистая сталь
This is the most common and economical option for wedge anchors. A zinc plating provides a basic layer of corrosion resistance. Installers should use these anchors exclusively in dry, indoor environments where exposure to moisture is not a concern.
Сталь с горячим цинкованием
Hot-dipped galvanized anchors have a much thicker zinc coating than their zinc-plated counterparts. This robust layer offers superior protection against corrosion. These are suitable for use in damp or humid indoor locations and some dry outdoor applications.
Нержавеющая сталь 304
For applications involving moisture or water, 304 stainless steel is an excellent choice. It provides substantial corrosion resistance and is often specified for wet environments and areas with exposure to certain chemicals.
Нержавеющая сталь 316
This material offers the highest level of corrosion protection. A 316 stainless steel wedge anchor is the premier choice for highly corrosive settings.
- Submerged freshwater or saltwater applications
- Coastal areas with salt spray
- Очистные сооружения сточных вод
- Environments with industrial chemicals
Determining Correct Diameter and Length
The dimensions of the anchor—its diameter and length—determine its holding power and suitability for a specific task.
How Diameter Affects Holding Power
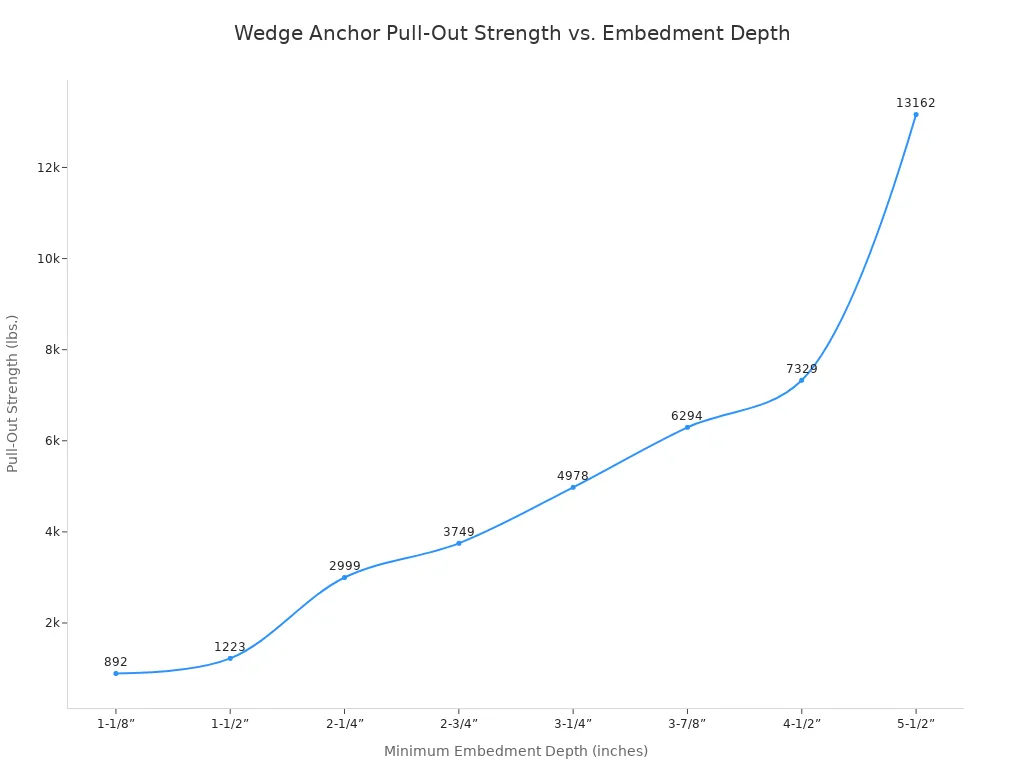
An anchor’s diameter has a direct relationship with its strength. A larger diameter anchor provides greater resistance to both tension (pull-out) and shear (side-to-side) forces. As the diameter increases, so does the required embedment depth, creating a significantly stronger hold in the concrete. The holding power increases exponentially with larger diameters.
Calculating Required Anchor Length
Choosing the correct size wedge anchor involves a simple calculation. The anchor must be long enough to pass through the fixture and achieve the required minimum embedment depth in the concrete base material.
Anchor Length Formula 📏
Fixture Thickness + Minimum Embedment Depth + Nut/Washer Height = Required Anchor Length
Deeper embedment significantly increases an anchor’s holding capacity. For example, a 1/2″ anchor embedded at 2-1/4″ has a lower ultimate tension load than the same anchor embedded at 3-3/4″ in the same strength concrete.
| Диаметр анкера | Глубина заделки: | Ultimate Tension (lbs) @ 4,000 PSI Concrete |
|---|---|---|
| 1/2″ | 2-1/4″ | 3,084 |
| 1/2″ | 3-3/4″ | 4,587 |
| 5/8″ | 2-3/4″ | 6,054 |
| 5/8″ | 4-5/8″ | 9,155 |
An installer must always refer to manufacturer specifications to confirm the minimum embedment for the selected anchor.
Wedge Anchors vs. Other Concrete Fasteners
An installer has many fastener options for concrete applications. The choice depends on load requirements, base material, and whether the installation is permanent. Understanding the key differences between wedge anchors and other common fasteners is essential for selecting the correct component for the job. This ensures both safety and performance.
Wedge Anchor vs. Sleeve Anchor
A sleeve anchor functions similarly to a wedge anchor but uses a different expansion mechanism. While a wedge anchor expands a small clip at its base, a sleeve anchor expands a full-length sleeve along the anchor body. This design difference leads to distinct performance characteristics. Sleeve anchors are versatile for various base materials like brick or block, but wedge anchors provide superior strength in solid concrete.
Comparison: Wedge Anchor vs. Sleeve Anchor ⚙️ The primary differences are in their mechanism and resulting holding power.
Характеристика Клин-анкер Рукавный анкер Механизм Expands a clip against the material Expands a sleeve against the material Несущая способность High; suitable for heavy-duty applications Lower; suitable for lightweight applications Грузоподъемность Highest among mechanical anchors Less than wedge anchors
Wedge Anchor vs. Drop-In Anchor
A drop-in anchor is a female anchor, meaning it is internally threaded. Installation is a two-step process. First, an installer places the anchor in the hole and uses a setting tool to expand it. Then, a separate bolt or threaded rod is inserted to attach the fixture. This design is ideal for applications requiring a flush surface or the ability to remove the bolt. In contrast, wedge anchors are a single-unit male fastener that allows for through-fixture installation, making the process faster for many applications.
Wedge Anchor vs. Concrete Screw (Tapcon)
Concrete screws, often known by the brand name Tapcon, operate on a completely different principle. They do not use an expansion mechanism. Instead, these hardened screws cut their own threads directly into the concrete, creating a secure connection. While they do not match the ultimate holding power of a heavy-duty wedge anchor, concrete screws offer significant advantages in certain situations.
Installers often prefer concrete screws for applications that require:
- Temporary installations or potential removal: Screws can be easily uninstalled, leaving a clean hole. This is ideal for temporary bracing or fixtures that may be relocated.
- Ease of installation: The process simply involves drilling a hole and driving the screw, which can be faster for light-duty tasks.
- Versatility for various loads: They are suitable for a wide range of uses, from securing electrical boxes and conduit to mounting light fixtures.
Клиновой анкер против клеевого анкера
Клеевые анкеры, также известные как химические анкеры, представляют собой принципиально иной подход к креплению в бетоне. Вместо механического расклинивания они используют двухкомпонентную химическую смолу для склеивания резьбовой шпильки или арматурного стержня с основным материалом. Это создает невероятно прочное, свободное от напряжений соединение. Выбор между клиновым анкером и клеевой системой в значительной степени зависит от конкретных требований проекта, включая нагрузочные характеристики и сроки монтажа.
Наиболее существенное различие заключается во времени до приложения нагрузки к анкеру. Механический крепеж, такой как клиновой анкер, готов к немедленному нагружению сразу после того, как монтажник затянет его с правильным моментом. Клеевым системам требуется определенное время отверждения, прежде чем они смогут выдерживать какую-либо нагрузку.
Факторы, влияющие на время отверждения клеевых анкеров ⏱️
- Температура окружающей среды: Более низкие температуры значительно замедляют химическую реакцию, увеличивая необходимое время отверждения. Более теплые условия ускоряют его.
- Тип смолы: Различные химические составы имеют разную скорость отверждения. Винилэфирные и полиэфирные смолы часто отверждаются менее чем за час, в то время как эпоксидные смолы могут достигать полной прочности за несколько часов или даже более суток.
- Спецификации производителя: Монтажник всегда должен сверяться с техническими данными производителя для получения конкретного времени гелеобразования и отверждения с учетом условий на объекте.
В то время как клиновые анкеры клиновые анкеры предлагают скорость и простоту, клеевые анкеры обеспечивают явные преимущества в определенных сценариях. Поскольку они склеиваются с бетоном, не оказывая распорного давления, они являются отличным выбором для установки вблизи кромки или рядом с другими анкерами. Они также могут достигать исключительно высокой несущей способности, часто превосходя механические анкеры, что делает их идеальными для самых ответственных конструкционных применений и соединения арматуры. Однако для многих тяжелых применений в цельном бетоне, где важна скорость, проверенная надежность и немедленная несущая способность клиновых анкеров делают их предпочтительным решением.
Распространенные ошибки монтажа клиновых анкеров, которых следует избегать
Успешная Надежность установки клинового анкера зависит от точности. Даже небольшие ошибки могут значительно снизить удерживающую способность анкера и поставить под угрозу безопасность. Монтажники могут обеспечить надежное соединение, избегая нескольких распространенных, но критических ошибок. Соблюдение правильной процедуры имеет важное значение для работы всех клиновых анкеров.
Использование сверла неправильного размера
Соотношение между диаметром сверла и диаметром анкера не подлежит обсуждению. Для клинового анкера требуется отверстие, диаметр которого точно соответствует диаметру самого анкера. Использование сверла большего размера создает зазор между разжимной гильзой и бетоном. Гильза не может расклиниться достаточно для создания необходимого трения, что приводит к проворачиванию анкера в отверстии или его вырыванию при малой нагрузке. И наоборот, сверло слишком малого диаметра вообще не позволит вставить анкер в отверстие, останавливая монтаж до его начала.
Неправильная очистка отверстия
Сверление бетона создает значительное количество пыли и мелких частиц. Недостаточно тщательная очистка отверстия является одной из самых частых причин отказа анкера. Эта пыль действует как слой мелких шарикоподшипников между разжимной гильзой и основным материалом. Она резко снижает коэффициент трения, не позволяя гильзе получить надежную опору. Нарушенная опора означает серьезное снижение удерживающей способности. Правильная процедура включает продувку отверстия, очистку его проволочной щеткой и окончательную продувку для обеспечения чистой контактной поверхности.
Недостаточный или чрезмерный момент затяжки гайки
Приложение правильного крутящего момента является завершающим шагом, активирующим клиновой анкер. Как недостаточный, так и чрезмерный момент приводят к отказу. Недостаточный момент затяжки гайки означает, что шпилька не вытягивается вверх достаточно для полного расклинивания гильзы, что приводит к слабому закреплению. Чрезмерный момент затяжки не менее опасен и может вызвать несколько видов катастрофических отказов.
Важность калибровки 🔧.
Превышение рекомендуемого крутящего момента может привести к перегрузке как самого анкера, так и основного материала. Возможные последствия включают:
- Разрушение стали самого анкера..
- Раскалывание или скол окружающего бетона.
- Проскальзывание анкера через клинья.
- Проворачивание всего анкера в отверстии., что указывает на его повреждение и невозможность установки.
Установка слишком близко к краю или другому анкеру
Несущая способность клинового анкера обеспечивается огромным распорным давлением. Эта сила создает конусообразную зону напряжения в бетоне под анкером. Монтажник должен учитывать физические ограничения бетонного основания. Размещение анкера слишком близко к свободному краю или другому анкеру может привести к перекрытию этих конусов напряжения или выкрашиванию боковой части бетона. Этот вид отказа, известный как откол бетона, происходит внезапно и может привести к полной потере несущей способности.
Инженеры и производители устанавливают строгие нормы минимальных расстояний между анкерами и до края, чтобы предотвратить такой вид разрушения. Эти расстояния рассчитываются на основе диаметра анкера и не являются рекомендательными. Соблюдение этих спецификаций крайне важно для обеспечения структурной целостности соединения.
Критически важные правила расстояний между анкерами и до края 📐
- Минимальное расстояние между анкерами: Расстояние между двумя клиновыми анкерами должно быть не менее 10 диаметров анкера.
- Минимальное расстояние до края: Расстояние от анкера до свободного края бетона должно быть не менее 5 диаметров анкера.
- Учет вибрации: Монтажник должен увеличить расстояние между анкерами, если применение связано с вибрационными или ударными нагрузками.
Последствия нестабильности крепежа могут быть катастрофическими. При обрушении здания L’Ambiance Plaza, которое привело к 28 смертельным случаям, одна из ведущих теорий указывает на нестабильность клиньев, поддерживавших пакет перекрытий. Следователи обнаружили, что большие зазоры и другие проблемы потребовали бы чрезвычайно высокого коэффициента трения для удержания клиньев на месте. Считается, что отказ этих небольших компонентов положил начало полному обрушению конструкции, что подчеркивает огромную важность правильной установки и стабильности крепежа.
Даже в неструктурных применениях затраты на неправильную установку значительны. Неправильное крепление стеллажных систем из-за несоблюдения требований к расстояниям может привести к катастрофическим авариям, травмам и крупным финансовым потерям из-за повреждения товарных запасов. Аналогично, попытка удалить неправильно установленные анкеры часто приводит к растрескиванию бетона и повреждению полов. Стоимость таких ремонтов может составлять примерно 15-25 долларов за квадратный фут и создавать постоянные эксплуатационные риски, что демонстрирует: единственно приемлемым методом является правильная установка с самого начала.
Клиновой анкер — это мощный и надежный крепеж для тяжелых нагрузок в монолитном бетоне, от крепления тяжелого оборудования до конструкционной стали. Прочность этого клинового анкера обеспечивается простым, но эффективным клиновым механизмом, активируемым при установке. Для достижения максимальной несущей способности и безопасности в бетоне требуется точность. Монтажник должен обеспечить правильный размер отверстия, его чистоту и момент затяжки.
Гарантия качества ✅ ICC-ES или ETA гарантирует, что продукт соответствует строгим, проверенным стандартам производительности.
Частые вопросы
Можно ли повторно использовать клиновой анкер?
Монтажник не может повторно использовать клиновой анкер. Процесс удаления повреждает резьбу анкера и распорную клипсу, делая его небезопасным для нового соединения. Для надежной установки в проекте всегда требуется новый анкер.
Можно ли использовать клиновые анкеры в кирпиче или блоках?
Клиновые анкеры предназначены исключительно для монолитного бетона. Высокая распорная сила, которую они создают, может легко расколоть или разрушить более слабые основные материалы, такие как кирпич, пустотелый блок или шлакоблок. Для таких материалов монтажник должен выбрать другой тип анкера.
Как удалить клиновой анкер?
Клиновой анкер создает неразъемное соединение. Его нельзя удалить целиком. Монтажник должен срезать анкер заподлицо с поверхностью бетона или конструкции. Наиболее эффективный инструмент для этой задачи — шлифовальная машина с отрезным кругом.
Что такое анкер с рейтингом “для трещиноватого бетона”?
Анкер с рейтингом “для трещиноватого бетона” сконструирован так, чтобы сохранять свою удерживающую способность даже в случае растрескивания бетона под нагрузкой. Строительные нормы часто требуют использования таких испытанных анкеров для навесных и структурных применений, чтобы обеспечить наивысший уровень безопасности.
Зачем сверлить отверстие глубже требуемой глубины заделки?
Более глубокое отверстие создает пространство для оседания оставшейся бетонной пыли. Это гарантирует, что анкер достигнет полной глубины заделки. Распорная клипса тогда сможет функционировать правильно, без помех от бурового шлама.
Что должен сделать монтажник, если анкер проворачивается в отверстии?
Проворачивание анкера указывает на неудачную установку, часто из-за слишком большого отверстия или неправильной очистки. Монтажник должен отказаться от этого анкера. Потребуется просверлить новое отверстие и использовать совершенно новый клиновой анкер.
Как скоро можно нагружать клиновой анкер?
Монтажник может приложить полную нагрузку к клиновому анкеру сразу после затягивания его до указанного момента. Эта немедленная несущая способность является ключевым преимуществом перед клеевыми анкерными системами, которые требуют определенного времени отверждения.